


Table of Contents:
- Urban | Rustic | Industrial
- DIY Pipe Shelf Update
- Industrial Pipe Shelves Stats
- Day One
- Day Two
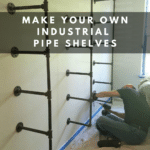
- How to Create Your Own Industrial Pipe Shelving DIY
- Step 1: Choose Your Design
- Step 2: Decide on the Size of Your DIY Pipe Shelves
- Step 3: How Many Supports Do you Want for your Pipe Shelves
- Step 4: Look and Function of your Industrial Pipe Shelves
- Step 5: What Kind of Finish Do You Want for Your Pipes?
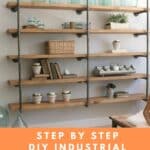
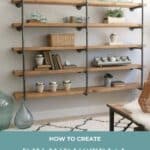
Build Your Own DIY Industrial Pipe Shelves with Tutorial, Step-by-step Instructions, Detailed Supply List, Pipe Shelf Decorating Ideas
DIY Industrial Pipe Shelves are an easy weekend project that require no special skills. Here is a budget-friendly step-by-step guide to make your own.
Urban | Rustic | Industrial

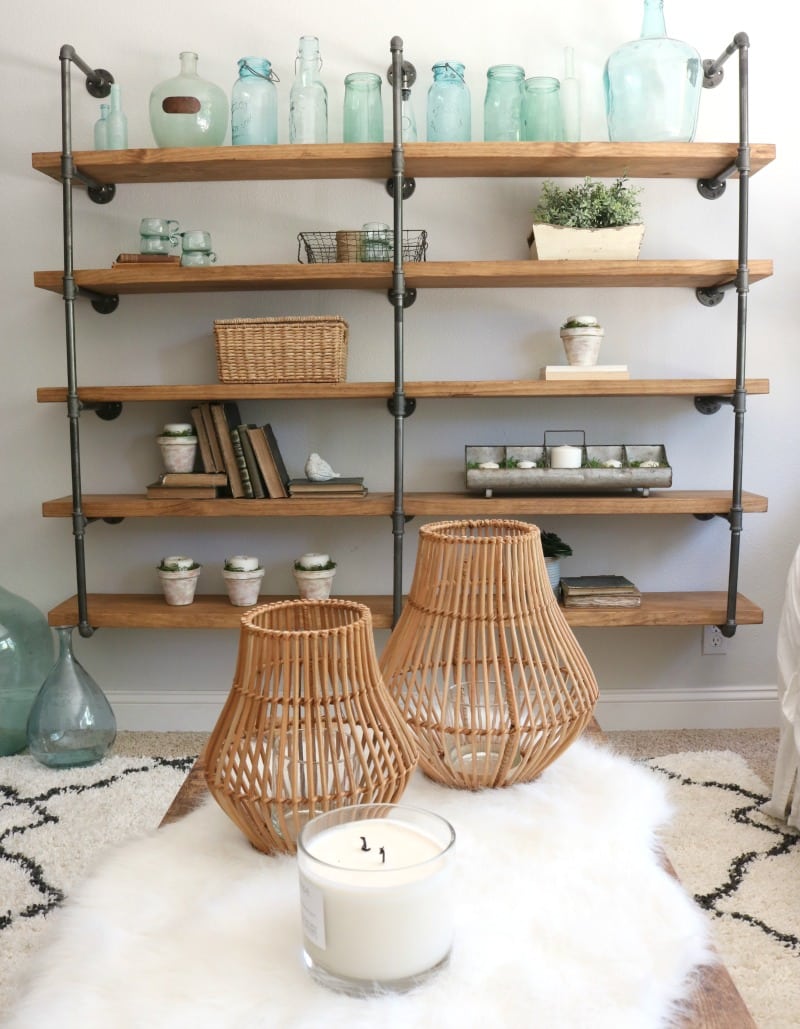
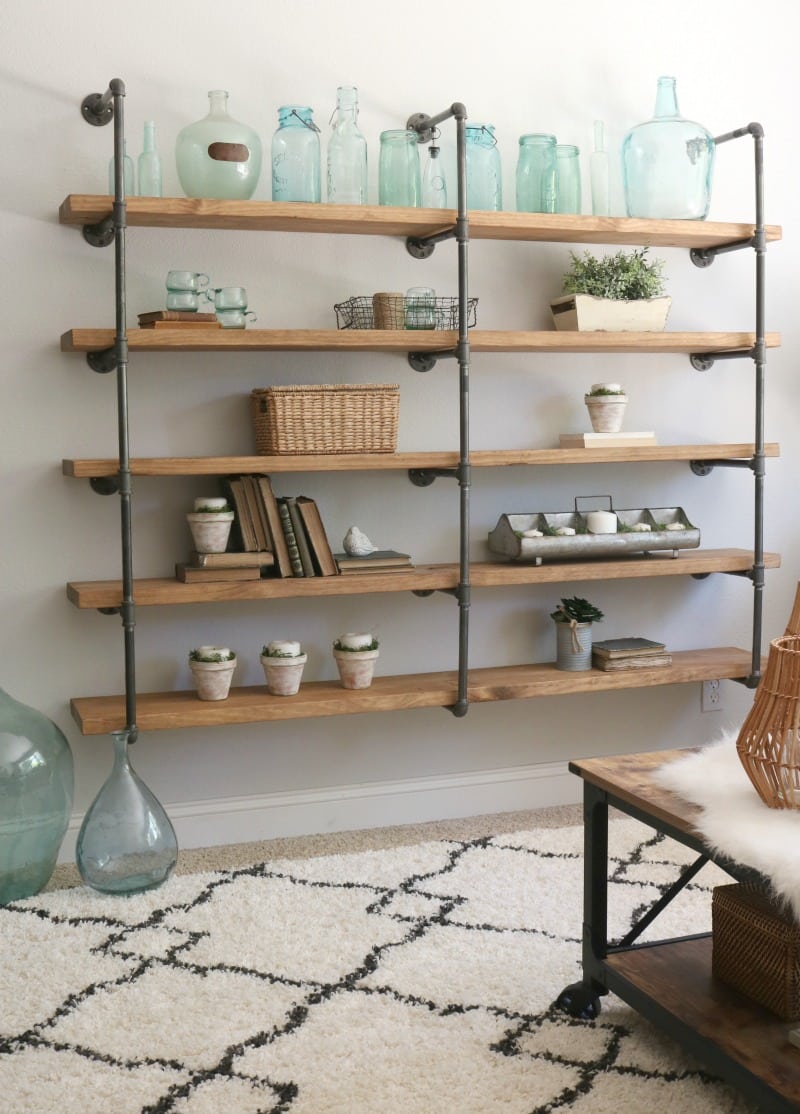
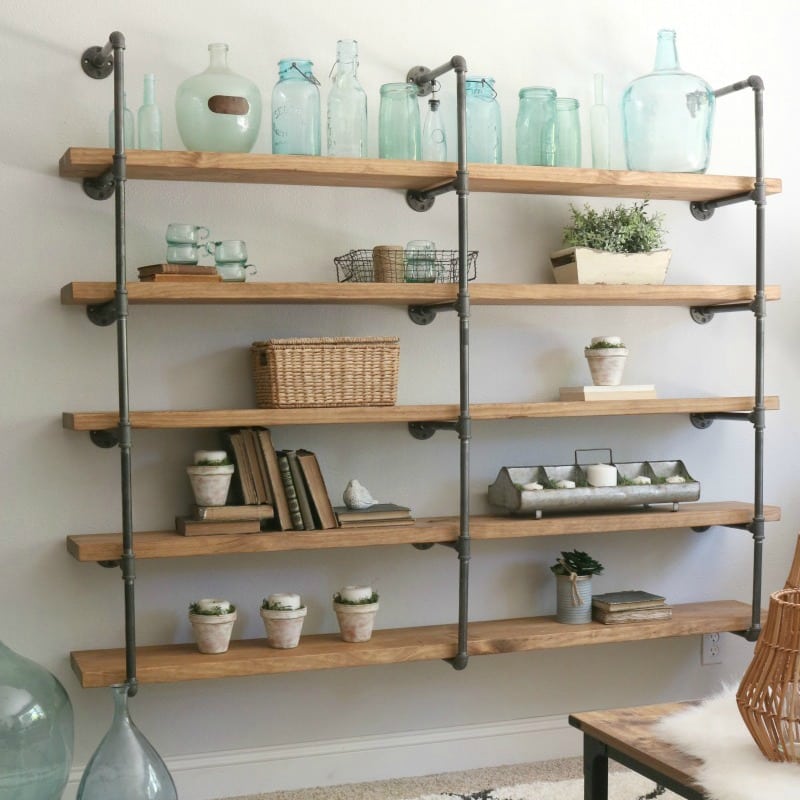
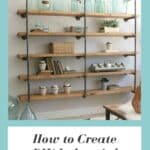
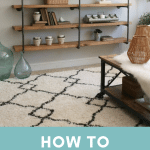
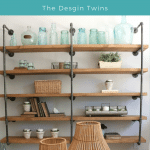
These DIY industrial pipe shelves are everything. Whether you are looking to fill an empty wall, create a fun storage option, add rustic charm to a kitchen, office or family room, these industrial pipe shelves will add a modern urban-farmhouse vibe to your space.
And, instead of spending thousands of dollars with the pre-made versions you can build them yourself for a fraction of the cost.
Follow my step-by-step tutorial to make your own DIY industrial pipe shelves.
DIY Pipe Shelf Update
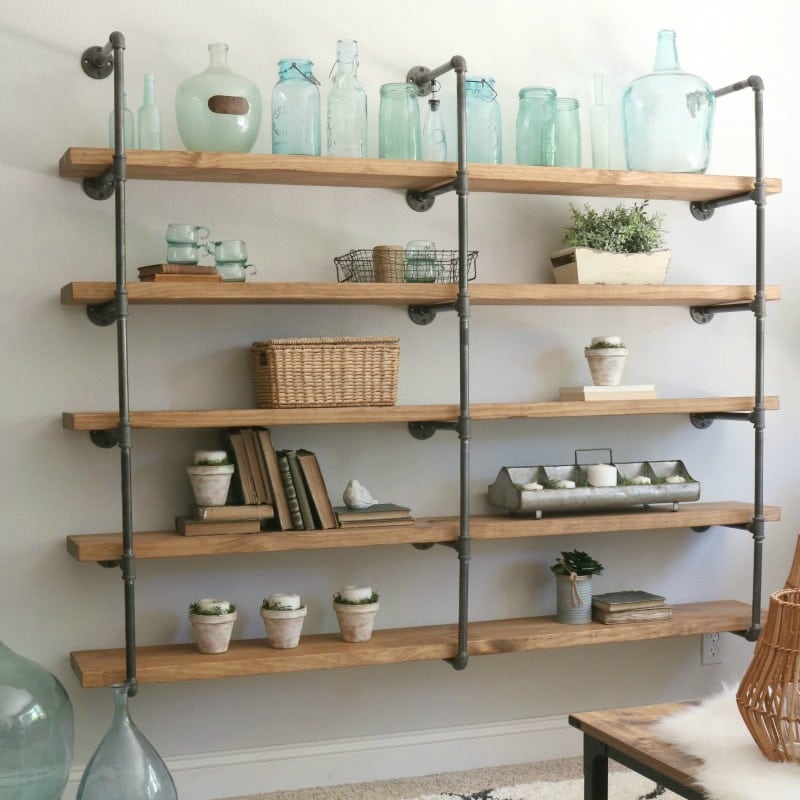
After about two years enjoying our beautiful DIY Industrial Pipe Shelving I decided it was time for an update. Originally, we wanted to complete the project as cheaply as possible and that was the main reason we decided to go with the inexpensive 1-inch boards.
Fast forward to this fall when we decided to upgrade the shelves with some higher quality, thicker pine boards. You will see photos throughout the post with both types of boards. It’s really just a matter of preference and budget.
For a reference point, here are the stats for the DIY industrial pipe shelf we built:
Industrial Pipe Shelves Stats
Cost: $350
Time: One Weekend
- The first day we made the plan, bought the supplies and put the first coat of stain on.
- The second day we put the second coat of stain, assembled the pieces and put them up on the wall.
If you count the amount of time it took me to research the project and then convince my hubby to do this with me the total time involved would be over six months. But, in the end we made these for about $350 and had them completed and ready for styling within two days.
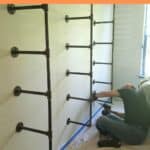
Day One
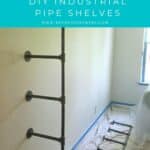
We made the measurements, drew out a plan (including labeled picture with measurements) and made a detailed list of supplies. Then we headed to the hardware store. Actually, to be totally honest, my husband made eight trips to the hardware store(s) looking for all the pipe pieces we needed, and to exchange a few pieces we got wrong.
Tip: Do not let your kids pick out the pipe pieces. You will need to double check the shapes and sizes because they aren’t always in the correct box. And finally, I did the first coat of stain so it could dry over night (this step is optional).
Day Two
Day two we saved for the “good stuff.” We put on the final coat of stain, assembled the pieces, and put them up on the wall.
How to Create Your Own Industrial Pipe Shelving DIY
Step 1: Choose Your Design
- What do you want your shelves to look like?
- Do you want it “floating” on the wall?
- Perhaps you want it hanging from the ceiling?
- Or, do you want it connected to the floor?

For simplicity, we decided to go with “floating.” My hubby didn’t like the idea of making holes in the ceiling nor did he feel like cutting into the carpet. Honestly, at this point, I was just trying to keep him happy and focused so we could get this project done.
Step 2: Decide on the Size of Your DIY Pipe Shelves
- Measure your space and find your studs.
- Most studs are spaced 16 inches on center so this is where your brackets will go. You should use a stud finder or double check just to make sure. You don’t want to plan your whole shelf unit only to find out it can’t go where you want.
- If you are making a smaller shelf and do not plan to put anything heavy on it you could manage to hang it without attaching it to the studs (you should have seen my hubby cringe when I asked him about this). But, while he probably wouldn’t risk it, he did say it would be possible to use sheet-rock anchors to attach it. However, with a large shelf like the one we made this wouldn’t be a good idea.
- Start to map out what you have space for and what will look good.
Step 3: How Many Supports Do you Want for your Pipe Shelves
Here is when you decide whether you want two or three support brackets for your industrial pipe shelves. I thought the hubby was going for over kill when he suggested three support brackets. I had seen a great design on Pinterest that had only two support brackets and it looked awesome. But he was worried it would not have enough support with just two.
Remember, I was trying to keep him happy so of course I let him win. Here’s the deal. I hate to say it, but he was right. Mostly because we were trying to cut costs and bought the cheapest boards sold at the hardware store. If we had used only two brackets these boards would have bowed under the weight.
Step 4: Look and Function of your Industrial Pipe Shelves
So, decide the look and the function of what you want to make. If you want to create a media center, for example, and are going for some amount of symmetry then you really want to go with two brackets. In this case you will want to plan ahead and buy stronger, harder (read: more expensive) boards.
Decide how many industrial pipe shelves you want and then count up the number of boards you will need. We wanted one shelve in the center that we could use for bigger items so we counted one fewer boards. I’ve seen one with no board on the very top and this is a good look, especially if you are putting your shelf close to the ceiling you might want to leave it off so you have at least one shelf with more space for bigger items.
Step 5: What Kind of Finish Do You Want for Your Pipes?
- Galvanized is more of a plain silver finish. This finish is specifically made to withstand rust and is more expensive.
- The black finish is cheaper but may be harder to find in the quantities needed (and thus the multiple hardware store runaround). And, warning, it’s kind of messy to work with. It is covered with oil so you will need to wash these. Even so the black will continue to come off on your hands.
- I’ve heard of people using spray paint to make their pipes look more uniform.
Note: Some galvanized are treated with a special coating and you may have trouble getting the spray paint to stick. Before you go crazy with this idea I would test it out.
Based on your above decisions start making your shopping list to make DIY pipe shelves free standing.
Our DIY Pipe Shelf Shopping List
To build our shelf unit of five shelves, six rungs and three support brackets this is what we used:
You may click on the picture for direct shopping links. We have included these affiliate links for your shopping convenience. We understand that you have lots of options when you shop. When you choose to shop with us it helps support our blog and we appreciate it!
33 – 10″ x 1/2″ black industrial pipes

18 – Wall mounts (“flange” is the technical term)

12 – 1/2 ” Tee connectors

5 – 1″ x 10″ x 6′ boards (least expensive) – Home Depot sells Poplar boards like the ones we bought for about $5/each. In reality they are .75″ x 9.25″.
When we upgraded our boards we chose 1 1/2″ x 10 x 6′ pine boards.
Quart size can of stain:
I used Dark Walnut by Minwax on the thinner, less expensive boards.
For the thicker pine boards we chose a lighter, warmer stain called “Early American.”

Step-By-Step to Build Your Industrial Pipe Shelves
- Assemble one bracket at a time and lay out on the floor.
- Be very sure to line up every fixture so they are exactly in line with one another. This is essential or you will end up with a wavy shelf. Note: In order to get all the pipes facing the exact same direction some will be tighter than others. This is not a problem because once pipes are secured onto the wall that will provide the secure connection necessary for shelf stability.
- Hold assembled unit against the wall at pre-measured location (this should line up with the studs). This is when four hands are really useful–ok, essential.
- Use a balance to ensure it is straight and mark the walls for the screw anchors.
- Align unit and screw in place. Note: We only put screws in the top and bottom holes because the left and right side holes are wider than the studs.


7. Put up the third support bracket.
Hopefully your boards are dry and you can put them up right away.
Then comes the fun part. Decorating them. My hubby was laughing at me. When the boards were finally dry (the next morning) I was literally running around the house gathering up decor from every room of the house, and I hadn’t even had my coffee yet.


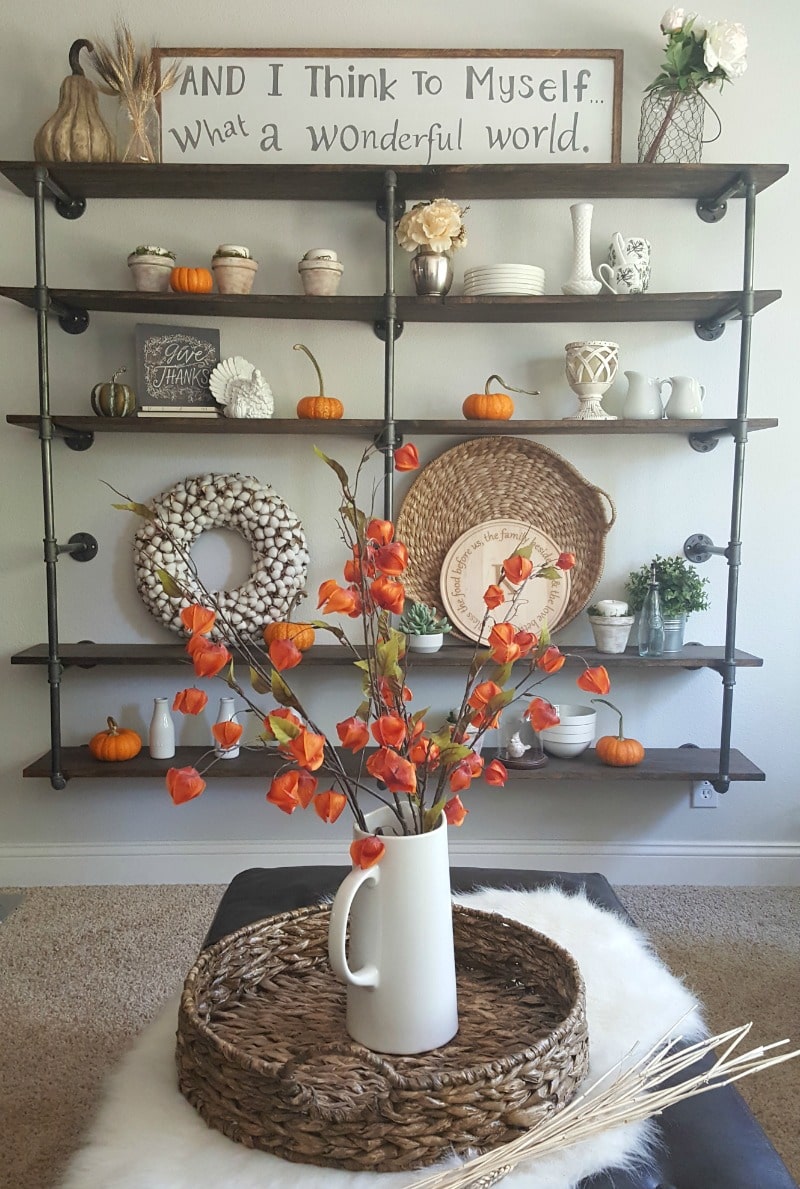
Every season I have had fun changing up the decor.

This is a summer decor version of my shelf. I really wanted more white accents. And the pop of natural green felt very fresh.

These iron pipe shelves are like a decor entity all to themselves. I enjoy decorating them and changing them up every season.
And the funniest part about this project? My hubby loves them at lest as much as I do. Go figure.
More DIY Projects
If you loved this easy industrial pipe shelves project, check out these other do-it-yourself home decor projects.
Easy Arm Knitting & Inexpensive Chunky Throw Beginner Project
Décor Macrame – How to Create Easy Wall Decor
String Light Planter DIY Project
How to Stencil a Fireplace (or a floor)

* This article contains affiliate links.


This is sooo gorgeous and looks easy to make as you described! Thank you for sharing the tips and tricks! You have a very sweet hubby 🙂 it would take a year to convince my husband… And a week planning 😉
Eszter, I’m so glad you enjoyed it. Good luck convincing your hubby. 🙂 xoxo Jodie & Julie
Rachel,
I’m laughing!! You are too cute!! I hope you get your own shelves some day! Thanks so much for your sweet comments. I’m so glad you liked it! Hugs, xoxo Jodie & Julie
I would love to make these! This is such a great post! good job, gals!!
OH Kellie! It’s so nice to see you over here on the blog. Thank you ever so much for visiting and for leaving your kind reply. This is Jodie’s post. She’s busy with her boys right now so I get the absolute pleasure of replying to you. Aren’t these the coolest shelves? I love how she has it really step by step so anyone can make these. It’s pretty exciting. If I had a free wall I’d consider doing them myself. Heck, with all the editing I did of this post I think I have the process memorized haha! It was a real and honest delight to share the hashtag with you. I’m going to go over to your blog and check it out. Thanks again, Sweet Friend! God Bless, Julie (and Jodie)
Saving this for my to-do project list! Exactly what I’ve been looking for!
Hi Ashley, Welcome to our blog! So glad you are excited to try these shelves. Yes, I too had them on my “to do” list for a while. Getting the hubby on board took the longest, and then setting aside a weekend. Honestly, though, hubby is just as happy and proud of them as I am, so that’s a win-win in our book! I will look forward to seeing your project done when it’s done. Please share with us how they turn out! Blessings for a fabulous Holiday Season, and we hope to see you again soon on the blog! XO ~ Jodie & Julie
Love these!! Now to figure out where to put mine!
Yay Amanda! Welcome to our blog! Thank you so much for joining us and for your sweet message. We are so glad you are inspired to make these shelves. We hope you find a spot soon. Please share with us how they turn out–we’d love to know. With blessings and gratitude, Jodie & Julie
Great tutorial and I have the perfect empty wall for it!
Dear CoCo,
Welcome to our blog! Jodie and I are thrilled that you enjoyed and benefited from this blog tutorial. It really does make our efforts worthwhile to hear. Bonus that you have the space to create this fun project. We hope to hear/see the end results, so don’t forget to come back and let us know how it goes. In the meantime, we hope you enjoy our other posts as well.
Wishing you and your family a Happy Holiday Season,
Julie & Jodie
Omgosh I love this what a great idea…Thanks for sharing…..and happy march madness….Thanks pat h
I love these shelves! Trying to convince my hubby to build us some. Thanks for the how to! March Madness!
Kayan, Aren’t they the coolest? I’m still smitten. Keep at your hubby…you saw the persistence it took for me, haha! You can do this! Julie & I are just thrilled that you made it to the blog. We sincerely hope you will continue to join us on this journey long after March Madness is over. With love & friendship, Jodie & Julie
Loved This Tutorial! Thanks so much!
Thank you again, Gail. We are so glad you are here. XO ~ Julie & Jodie
Love the tutorial!
Hi Gail, Thank you for stopping by. We hope you will give it a try. Let us know if you do…we’d love to see. In the meantime we hope you will come back often and join us on this fun journey to be inspired and motivated to be your best and lots of fun along the way. With love & blessings, Julie & Jodie
Jodie ~ Such detail in your writing always! It’s absolutely a stunner shelf!
March Madnesss
Thank you,
Regina
I love the industrial look!! We made our stair hand rail out of galvanized pipe and these shelves are next in the list! ☀️March Madness!
March Madness, this is amazing! And looks much more simple than I thought. Thank you for sharing !
You got it Melanie! Hopefully you’ll be able to make these. Let us know if you do…we’d love to see how they turn out. With blessings, Julie & Jodie
Its look Beautiful!
Must try this, and I love your decorating styles. Look forward to both your insta stories every day. I have a twin brother, so nice to see your sweet bond with each other.
And what I love about this beautiful project is that a single Grandmother, like myself, could do this. (With maybe a little help from my son.)
Plus if you’re working on a small budget you could collect the pipes and fittings a few at a time, until you get all that you need.
I wonder if they would hold up well in the outside elements.
March Madness continues. ????
Those shelves are so beautiful!
March madness ????
Loving this tutorial. I am going to try this in my husbands man cave. Thank you for giving me the courage to try industrial pipe shelves. Wish me luck!!
Absolutely love these!! I will have to make them for my bedroom!! #MarchMadness
Robert, I hope you do! And if so I expect to see a picture reveal haha! Good luck. Thanks so much for your sweet support, Julie & Jodie
Love love love! Much simpler than I thought. March Madness
I absolutely love these. I am working on my bedroom make over and I wanted to do some shelves like this. I love the step by step. So helpful…
March madness
These are so cool and yours turned out great! Glad you could convince your husband to do it and thanks for sharing!
Love these! Im a sucker for shalves that can be so easily changed to match the season!
I have a wall waiting for this only my husband runs from tools. I think this is something he might consider. Love the way you styled them through the seasons
How fun are these?! I love the pipe shelf look and so many fun ways to decorate and tou can make it farmhouse, modern, rustic….options!
I have always drooled over your shelves.. now maybe I can get my husband to make me some. Your info and tutorial is easy to follow. Thanks for sharing!! March Madness
Loveee these! I just got my first place and see so many things that inspire me
Love getting to know you gals through your posts. Thanks for all the creative information! 🙂
So if I read the tutorial correctly, you bought the cheaper black pipe, but washed them and then they turned out silver? I love the end look of your pipe shelves and am 3 months into the planning.
Hi Rhee,
No, sorry for the confusion. The washing was really just to get the tape off and rinse them a bit. This rinsing process did not change the color or the way they looked. These are the “black” version of the pipes –which isn’t really black at all, but looks more like a pewter color. The silver is really polished, bright and shinny. We didn’t want to go for this look. We wanted it to look rustic. If you wanted it pure black you would have to spray paint it black. The ones we bought are the blackest version that is sold, at least at the hardware store. I hope this helps clarify.
Good luck on your project!
All the best,
Jodie & Julie
Guess who put everything together and forgot to buy screws? I mean they weren’t on the list….#commonsensefail
Me too!!!
Question…I’m having a hard time getting my pieces to be positioned in the right direction once tightened…is this just trial and error or did you leave some pieces a bit loose so they’d be facing in the right direction…? Is there a wonderful trick? 🙂
PS I have blisters from rubbing the tape/stickers off my pipes… hahaha
Dominique,
We just left them loose. Once it’s bolted into the wall the pipes do not need to be tight to be secure. Good luck, hope your blisters heal quickly. Best wishes, Jodie & Julie
hi there love these shelves and am about to make mine, what size and type of screws did your hubby use? I am sure Home Depot could help me but thought I would ask you. can’t wait for mine to be done.
Hi Marieanne,
I’m sorry, now that the screws are in the wall I honestly would be guessing (also, since some time has passed I don’t remember.) I would think your better bet would be to ask the guys at Home Depot. Good luck on your projects! XO ~ Jodie & Julie
These shelves are beautiful. What are the width and depth of each of the shelves?
Thanks in advance!
Jamie
Hi Jamie,
The measurements of the shelves is in the post. Thanks for visiting our blog. Good luck on your project. Blessings, Julie & Jodie
Can you tell me the measurements of this shelf? And, you did use anchors in the studs?
Love your post!
Amy
Hi Amy,
Thank you for reading our blog. The answers to both of these questions are actually in the blog post. Yes, we used anchors in the studs. The length of the boards I forget off the top of my head but all the info including exact size of the boards is all provided in the post. Good luck on your project. Blessings, Jodie & Julie
I love this unit and to be honest it’s the best tutorial out there (complete with the links to purchase the parts! Score!). What I can’t seem to find anywhere on here is the overall dimensions of the unit? I’m pretty sure I can back into the math given the length of the pipes, but I’d love to know (with all the parts hooked together) the total height and length. Thanks!
Hi Melissa,
Sorry for the delay in getting back to you. The dimensions of unit are: boards are 6′ x 9″ x 1″, the pipes are 10″ pipes away from the wall and the height of the unit is 4’11” from the bottom board to the top. We didn’t center it on the wall because we wanted a larger area at the top to display taller items. Hopefully this is helpful. Good luck, Jodie & Julie
I enjoyed reading this DIY industrial pipe shelf plans. With some modifications, I plan to do something similar in the closet of my home office. Not only that, I thought it would be cool to make a matching desk as well.
Question: What wood did you use for the shelf board, and what is its dimension?
Jay, Glad you enjoyed the pipe shelf project. The wood used is the most basic, inexpensive wood boards from Home Depot, 6′ long x 9″ deep x 1″ thick. Good luck with your project. Take care, Julie & Jodie
Absolutely in love with this. You didn’t mention using any polyurethane. Have the boards held up well without it?
Glad you enjoyed this post Melissa. The boards are holding up perfectly well without polyerethane. But I’m just placing decor on them. If you are going to use them for for maybe storing items or kids rooms where there might be a lot of wear on them I might consider. Otherwise I don’t think there is a real need. Take care, Jodie & Julie
[…] custom shelving. Better homes and gardens' contributing editor danny lipford shows you how. Diy industrial pipe shelves! Build your own!. Diy industrial pipe shelves are an easy weekend project that require no special skills. Here is a […]
[…] and highly versatile. Make the diy shelf combination of sizes and depths you need for any room. Diy industrial pipe shelves! Build your own!. Diy industrial pipe shelves are an easy weekend project that require no special skills. Here is a […]
Where did you get the sign IT’S A WONDERFUL WORLD ?
Thanks.
Hi Georgeann,
The sign is from Kristy at @thepaintednest She is so talented and a sweetie. Tell her you got it from us 🙂 Blessings, Julie & Jodie
The vertical pipes look longer than 10” , What size are they?They look longer than 10” I only
Want to do 4 shelves but worry that some items might not fit between the boards.
Thanks, Phyllis
Hi Phyllis,
Just as I said in the post the vertical pipes I used were all 10″. They may appear longer because of the connectors. Good luck on your project and thanks so much for stopping by. All the best, Jodie & Julie
Hello, great tutorial. Just wanted to let you know that standard stud spacing is 16″ on center (oc), not 18″.
Thanks, George
Thanks George! Love that input. Take care, Jodie
Just some thoughts from my experience that may help with some of the problems you ran into with the greasy pipe, galvanized pipe and painting.
This size pipe also comes in plastic and you can get it in a bunch of lengths and it comes threaded as well. To keep the industrial you could still use the steel elbows and connectors.
Then clean the metal bits in a good grease cutter such as dawn dry completly then use a spray primer before applying top color coat. Since the pipe lengths are short there’s no problem with the assembled piece as to it being strong enough to carry pretty much any weight.
The problem with the paint sticking to either the galvanized or black metal pipe I believe was due to the oil on the metal. But as I mentioned above a good degreaser, primer and than the top coat would solve that issue.
Using plastic pipe would also make the whole thing much lighter allowing you to completely assemble it. Then just stand it up, set it on some books or wood to get you bear the right height, level and mark a few holes along the top. That should hold it while you mark all the remaining holes, put in plastic anchors and then it’s just zip and zip to screw everything in. Should be solid as a rock.
Joe,
Thank you for all the useful tips and suggestions! We will make sure to keep these in mind for the future, hope you continue to check out our latest posts and get inspiration as well! XO ~ Julie and Jodie
super nice. I do some similar projects.
Pet,
Thank you for the sweet comments! We are glad you found our blog and hope you continue to find inspiration on here in the future!
XO ~ Jodie & Julie
Just finished my own! Thank you so much for the idea and tutorial. Unfortunately, we too made multiple trips to Home Depot due to purchasing 12” and 10” pipes. We put the entire thing together before we realized what happened! In the end, it turned out great! I wish I could post a photo on this thread.
Cait and Eric,
We are so glad you enjoyed this DIY tutorial! So excited to hear it turned out so well! Thank you for the sweet comments!
Lots of love,
Jodie & Julie
Love this look! What is the depth of your shelves? are they 10″ or 12″?
Glad you like the look of the shelves. Sorry for the delay in reply. Your message got buried until now. My boards are actually 9″ deep. Good luck with your project. All the best, Jodie & Julie
Oh my gosh!! I’m so glad I found this… I want to do this in my sons room…. Great tutorial, thank you so much for your guidence!!
Hi Vikki,
Yay! We are so happy our pipe shelves tutorial helped you. Thanks for joining us on our blog and for your kind reply. It makes our day to hear from you! Hope you continue to enjoy our blog posts. Wishing you the best, Julie & Jodie
I love your updated look with the lighter wood! What was the wood and stain used on your update?
Hi Mandy,
If you refer back to the blog post the updated wood came from Delirious By Design https://www.deliriousbydesign.com/collections/best-sellers/products/industrial-floating-shelf-1 Jodie chose the color “Early American”. Have a great day, Julie
Loves these shelves! I dragged my husband to Home Depot and we talked through the plan and materials. I have the perfect wall and high ceilings to put up 7 shelves. Once I figure out where the studs are, I’m making this design challenge a reality!
Lisa,
This is so exciting! This is still one of my husband’s and my favorite projects of all time. The shelves have now been up almost 3 years and we still love them!
Good luck! And I hope you love your new shelves!
xo Jodie
[…] Source by thedesigntwins.com […]
So i just bought the supplies to make this for our library! I have to say i ordered everything and when it came in I had to double check your diy because the pieces look so small until you put them together! I can’t wait to get it up and filled!!
Laura, We are excited for you. It is such a great project that we know you’ll be proud of. Let us know how it turns out. We’d love to see a picture if you can. You can direct message us on Instagram at either @jodie.thedesigntwins or @julie.thedesigntwins. Good luck! All the best, Jodie & Julie
[…] Source by thedesigntwins.com […]
My husband just made this not to long ago at all! It was so fun and we involved the kids also!
Nikki, I’m so glad you had a fun time creating this project. That’s a win/win! Thank you for visiting our blog. We hope you continue to visit us and enjoy. Blessings, Julie & Jodie
[…] (adsbygoogle = window.adsbygoogle || []).push({}); Best Industrial Pipe Shelving DIY from DIY industrial pipe shelves. Source Image: http://www.thedesigntwins.com. Visit this site for details: http://www.thedesigntwins.com […]
[…] (adsbygoogle = window.adsbygoogle || []).push({}); Best DIY Industrial Shelves from DIY industrial pipe shelves. Source Image: http://www.thedesigntwins.com. Visit this site for details: http://www.thedesigntwins.com […]
[…] (adsbygoogle = window.adsbygoogle || []).push({}); Best Pipe Shelves DIY from DIY industrial pipe shelves. Source Image: http://www.thedesigntwins.com. Visit this site for details: http://www.thedesigntwins.com […]
[…] (adsbygoogle = window.adsbygoogle || []).push({}); Best DIY Pipe Shelves from DIY industrial pipe shelves. Source Image: http://www.thedesigntwins.com. Visit this site for details: http://www.thedesigntwins.com […]
You girls are The Best!! I’ve been wanting shelving like this in my new home and now you’ve made it do-able for me. THANK YOU for breaking it all down with pictures, step by step directions, and a supply list. Your shelves look fantastic…and kudos to hubby for supporting your creativity (I bet he’s glad he did…hehe).
Love your blog so much and look forward to more fun projects in the days ahead! <3
Debby
Yay Debby! We are so happy to hear you loved the post! You are going to love your shelves. It’s empowering to realize you can make something like this. Plus it adds so much to a space. Good luck. Let us know how it turns out. Blessings, Jodie & Julie
[…] Download Image More @ http://www.thedesigntwins.com […]
[…] Download Image More @ http://www.thedesigntwins.com […]
[…] Maximize your home storage space by installing this very cool industrial pipe shelving. It will be a brilliant way to shift your items on the wall without using further inches of floor space. This big industrial shelving scheme is just ideal for storing books, utensils and other items of this kind. Full guides here thedesigntwins […]
This is great. I plan to do shelves like this for our wet bar (and free up some counter-space for the things that don’t fit in the cabinets). I made a pipe light already and have an idea of what it’ll take to do it but i like seeing how much weight you were able to put on these shelves with the brackets just bending around to and not needing to be braced on the top and bottom as well.
Alcohol can be heavy so i was willing to sacrifice a little space in my original design to be braced on the counter for front end support but now I think i can sell my engineering husband on not having front legs on the counter if I have it braced into studs on the wall and then into the ceiling as well…. but maybe not even the ceiling too…. oh the design options
I think it’ll be half inch pipe instead of 1 inch but only 16 inches apart (1 stud set to the next… having opened the wall to put recessed lighting and an electrical drop to the switch). Sorry. Rambling.
Elizabeth, It sounds like you are taking all into consideration. When you have serious weight to support you do need to think it through. The pipe shelves are inherently strong, but they are only as strong as the walls, floors, or ceilings that support them. Thin drywall can’t always be trusted. I hope our post helped you think it through. And we wish you all the best with your project. All the best, Julie & Jodie
Love! I see you used Dark Walnut in The tutorial, but on the top picture it’s the dark pipe with the light wood, what color stain did you use on that wood?
Hi Bridget,
I did mention both shades in the post (but no worries…it’s a long post 🙂 The lighter stain is called “Early American”.
Good luck with your project! Blessings, Julie & Jodie
[…] Cour The Design Twins Cascade Iron Co bre PURPOSED DEXTORATE THRIFTY DECOR CHICK Micheala Diane […]
do you have a ‘printed version’ of this blog. I’d like to be able to make some notes on the pages, etc thanks in advance, Barbara Ronzetti
Barbara,
You can easily just print the page from your computer or we have a DIY Pipe Shelves cheat sheet available to print as well. I hope that helps!
Lots of love,
Jodie & Julie
What an awesome design! How sturdy do you think these shelves are? Would you hesitate to fill each shelf with a hardcover book, from end to end? Thinking about doing this in my study!
Tim,
We are so glad you found this DIY project helpful! They are very sturdy actually! No, not at all. That should work just fine. Good luck with your project, it sounds like it will be amazing! Thank you for taking the time to leave a nice comment as well. We appreciate it so much.
Lots of love,
Jodie & Julie
Tim, Jodie, Julie, and the world (lol),
I’m stunned you don’t have an abundance of comments over the last couple months. 😊😷 But I’m glad Tim beat me to the very same question I have: weight capacity. Gorgeous work too! This has to be the easiest and most versatile for space design I’ve found. Brilliant! And thank you for sharing this with the web.
On vacation this week from my essential job installing the very thing we all rely heavily on right now: a reliable internet connection. Unfortunately, we are forgotten, but there’s no shame (I feel) in mentioning it wherever I can. 😁😉 Now? OFF TO THE HARDWARE STORE! 🤸♀️
Angi,
Aw that’s so sweet of you to say friend! This means so much to us. You’re so welcome! So glad you found it useful and are inspired. Good luck with your project!
Lots of love,
Jodie & Julie
[…] fit under the window in our nook nicely and kept the books handy but somewhat out of sight. Industrial shelves made from inexpensive plumbing pipe and stained boards are not only very stylish, but a great DIY […]
[…] Download Image More @ http://www.thedesigntwins.com […]
[…] fairly similar project is also featured on thedesigntwins. In this case however the unit is fixated on the wall alone with the space underneath being open. […]
I looooove the shelving. I’m going to create Ifor our living room and have my son in law install them for us. I’ve been searching for the right decor to go in the space where our fireplace is. There’s two empty spaces on each side of the fireplace and I think this will go perfecto!! ❤️❤️❤️❤️ Blessings! Love your blog. Found you on one of your IG reals!!
Emma, Thank you for the kind reply. Don’t you love it when you find just the right idea for a space? We sure do. And we love the fact that we helped inspire you. We hope you continue to enjoy our blog. Good luck with the project. XO ~ Julie & Jodie
What type of pipes did you use with the lighter color shelves? We have been trying find darker metal but the black we found is very black like rubber feeling and the galvanized was too shiny.
We were lucky. These were the standard available at Home Depot when we went shopping to create these shelves. If your local hardware stores aren’t supplying the color you like we suggest trying online sources. Good luck, Jodie & Julie
Ok so these are amazing! Did you just make 1 full unit or did you do 2?
Hi Maria,
My husband and I created 2 full units. We love them. They are versatile. You can change them and adjust them as needed. Good luck with your project! XO ~ Jodie & Julie
[…] easy DIY shelving unit is the perfect beginner project. Using wood, stain and “off-the-shelf” (pun intended :-D) steel pipes and fittings you can […]
Thank you for the inspiration and instructions! I built my version in my living room, and they turned out amazing!
Amanda,
That’s awesome! We love to hear that. Thanks for sharing. We sure hope you continue to enjoy our blog. Happy New Year, Jodie & Julie
I can’t wait to get started on this project! We just bought an older apartment in a more industrial district and these shelves are going to look so good. After they’re in we’re going to resurface the wood flooring and start looking for renters. Thanks for sharing.
Alicia,
We’re so excited you are going to try out this project. That sounds like such a good plan! Good luck with your project and so glad you enjoyed this post.
Lots of love,
Jodie & Julie
We just finished this project in my daughters room! It looks great! We didn’t stain the boards bc they looked fine without it! We thought it would be too big but it actually looks way better than the IKEA box shelves we had before! We couldn’t find the silver pipes but the black looks fine and was messy, so thank you for that tip. There are numbers on the pipes that just add to the look. Our daughter loves reading and this solution was perfect bc it’s not on the floor!
The studs were off set and we had to adjust to make sure they went into the studs. I’d love to attach a picture if interested?
Krista, That sounds amazing. We’re so glad you love the end result. Most importantly, your daughter loves it 🙂 We also love how form and function collide with this project. It’s really a win-win. Unfortunately we don’t have the option to add a photo to comments. You can send it to us via DM on Instagram @julie.thedesigntwins and @jodie.thedesigntwins. Blessings to you, Julie & Jodie
I’ve been looking all over the page to see what size screws you used to secure them to the studs but can’t find any information. Do you happen to remember?
Love this! So I am planning on using this for books and I was wondering if a hardback would fit using the 10″ pipes and 2″ board. Looking at your picture makes me think it might, but I’m not sure. Can you fit them on it?
Hi Tracy,
It depends on the actual size of your hardback. With 10″ pipes you get the width of your boards, so about 8-9″. Just do a quick measure of most of your books to see if they fit. Good luck with your project, Jodie
These shelves are so beautiful!!! I am in love with them and how you styled them. I would love to try and recreate this in my guest room in Yuba. I am doing some wood floor refinishing in there next week, but maybe after that!
Jackie,
We are thrilled to hear you are loving these shelves. How exciting you are getting your floors refinished. And it will be a great time afterwards to add new shelves to your room. Good luck with your redecorating projects. So happy to inspire. Best wishes, Jodie & Julie
Great idea. Did you use the black pipe or galvanized pipe? And did you paint them?
Hi Roz,
These are not galvanized pipes. These are black pipes we used. We didn’t have to paint them. You can choose to use either, depending on which you prefer. Good luck with your project. Best, Jodie & Julie
So happy to have found this DIY project. It’s just what I was looking for to build my shelving in my new studio.
That’s so awesome Danielle! We wish you great luck on this project! Let us know how it turns out! Best, Julie & Jodie.
Thank you for your DIY instructions. Instead of wood shelves could glass shelves be used?
If you want to use glass shelves instead we don’t see why that wouldn’t work. It’s a totally different look, but we think it could be gorgeous in the right setting. Good luck with your project! Best, Julie & Jodie
[…] fairly similar project is also featured on thedesigntwins. In this case however the unit is fixated on the wall alone with the space underneath being open. […]
[…] Project details: thedesigntwins.com […]
Love your shelves. Do they just stay in place? Is there a way to secure them?
Hi Lynne, Great question. They stay perfectly in place. You don’t need to secure them. Good luck with your project, Jodie & Julie
[…] There might be so many ideas running in your mind for making a project out of the industrial pipes. But DIY pipe shelves will be more worthwhile than the others. It can be done in one weekend with your beginner’s skills. Jump to the instructions in the link and see what you have to do. thedesigntwins […]
[…] Tutorial […]
[…] Tutorial […]
Oh my! What a lovely, rustic shelf! I would love this as a bookcase for our school room! I’d probably have to double this project so that it lines the entire wall (we have tons of books!).
I wouldn’t be able to attach it to the wall and it would have to be free standing. Do you have any tips or suggestions for doing this? I know I would need more pipes and tee pipes for the back side. But what about the support for the bottom? Would more flanges be needed? Books are heavy so I know we’d need thick, more expensive boards.
Thanks for any help you can provide!
Hi Bess, Not attaching this type of heavy-duty bookshelf to the wall, especially around children, makes us nervous we have to admit. Simply for safety it worries us not being attached. We are not engineers and unfortunately we don’t have any experience with free-standing pipe shelves. We wish we could offer more assistance, but we don’t want to steer you wrong when we are not experts. We wish you luck, Julie & Jodie
[…] Click Here […]
[…] Via Designtwins […]
What a nice diy that everyone can refer through it. For sure those steels are of quality and reliable.
[…] Click Here […]
[…] Via Thedesigntwins […]
[…] Source: http://www.thedesigntwins.com […]
[…] Source: http://www.thedesigntwins.com […]
[…] Source: http://www.thedesigntwins.com […]
Thank you for this tutorial. We just completed a beautiful bookshelf in our church. So thankful for you twins! Now to work shiplap in our bathrooms. Your tutorials are a blessing. Thank you!
Heather, that is so exciting. Thank you for your kind reply. Good luck with the shiplap. All the best, Julie & Jodie
Can’t wait to build one for my man cave and all of my diecast models
Awesome! We’re glad you’re excited to create. Let us know how it turns out! XO ~ Julie & Jodie
Thanks for sharing!
[…] Click Here […]
Amazing shelfs made of water pipies. I am impressed.
We’re glad you’re impressed. Thanks, Jodie
[…] Check Details […]
[…] Are you looking for a way to add some industrial look to your home? Consider building DIY industrial pipe shelves with this DIY plan! This easy project requires no special skills and can be completed in just a few hours. Once finished, these shelves make a great storage option and can add a touch of rustic charm or a modern urban-farmhouse vibe to your space. Best of all, you can save hundreds of dollars by building them yourself instead of purchasing pre-made versions. So gather your supplies and get ready to build your own DIY industrial pipe shelves! designtwins […]
[…] projet assez similaire est également présenté sur lesdesigntwins. Dans ce cas, cependant, l’unité est fixée au mur seul, l’espace en dessous étant […]
I made something similar. Too bad I cant atrtache a photo.
[…] There might be so many ideas running in your mind for making a project out of the industrial pipes. But DIY pipe shelves will be more worthwhile than the others. It can be done in one weekend with your beginner’s skills. Jump to the instructions in the link and see what you have to do. thedesigntwins […]
Hello, I want to thank you for writing this kind of content. However, I will also check up on your website twice a week to read more great content like this-
[…] Click Here […]
The Step by Step DIY Industrial Pipe Shelves guide is a fantastic resource for anyone looking to add a touch of urban, rustic, or industrial charm to their home decor. This comprehensive guide takes you through the entire process, from choosing the design to assembling the shelves with detailed step-by-step instructions and a supply list.
We are so glad you liked the post. We did take a lot of time and care making sure it was complete. Thanks for your reply, Julie & Jodie
These industrial pipe shelves that you can make yourself are going to completely change the game! The Design Twins have surpassed even their own standards with this exceptionally clever concept. These shelves not only offer a great deal of storage space, but they also lend a chic and country air to the ambiance of any area they are in. I literally cannot wait to give this idea a shot!
Your step-by-step guide to creating DIY industrial pipe shelves is absolutely fantastic! Your detailed instructions and thoughtful tips make it clear that this project is approachable and perfect for both beginners and DIY enthusiasts.
Thank you Marcel, for your kind reply. That is certainly our goal. Hope you continue to enjoy our blog. Best, Jodie & Julie