


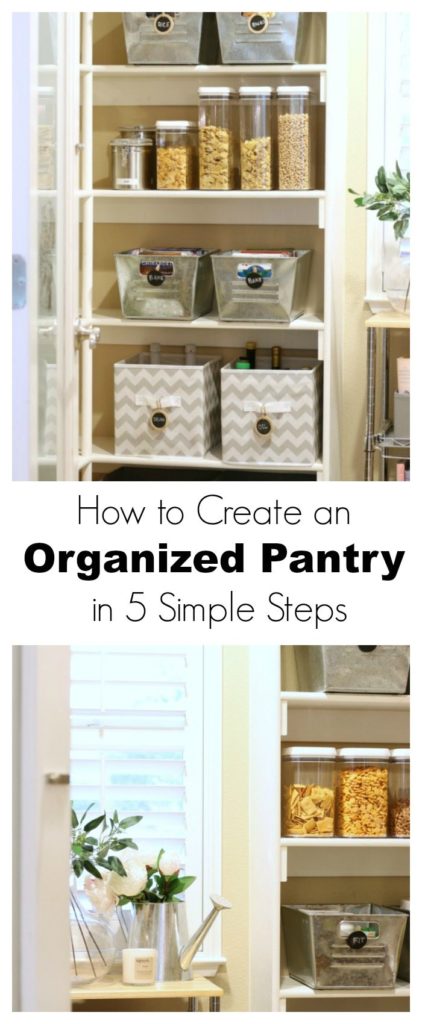
Table of Contents:
- Before: Cluttered/Disorganized Pantry
- After: Organized Pantry
- Step One: Declutter to Create an Organized Pantry
- Step Two: Planning to Create Your Organized Pantry
- Step Three: Shopping for Your Organized Pantry
- Step Four: Make Your Organized Pantry Pretty
- Step Five: Final Touches to Your Organized Pantry
- You Have an Organized Pantry
- Next Steps for Your Organized Pantry
how to Start the New year fresh with an organized pantry!
Get ready to declutter and re-organize your cluttered pantry for good. We’re here to help you get organized for the New Year and get one step closer to achieving your organizing goals.
When we think of the New Year, we think of resolutions and organization. They go hand in hand like champagne and New Year’s Eve. It’s only natural to want to begin your new year with a fresh start, and this often begins by getting our homes organized.
Capitalizing on this almost instinctive motivation, Jodie and I are getting straight to work. Today we are going to show you an important reorganization project: The Pantry. Using our step-by-step tips and tricks, plus perfect product suggestions we are going to show you just how easy it is to create an organized pantry.
Jodie and I are SUPER excited and honored to be part of the BHG Live Better Influencer Network. We are compensated when sharing our favorite finds from Better Homes & Gardens at Walmart. As always, our opinions are our own. Affiliate links for product sources are included for your shopping convenience.
Be sure to check out more affordable organizing solutions from the talented bloggers at the BHG Live Better Influencer Network.
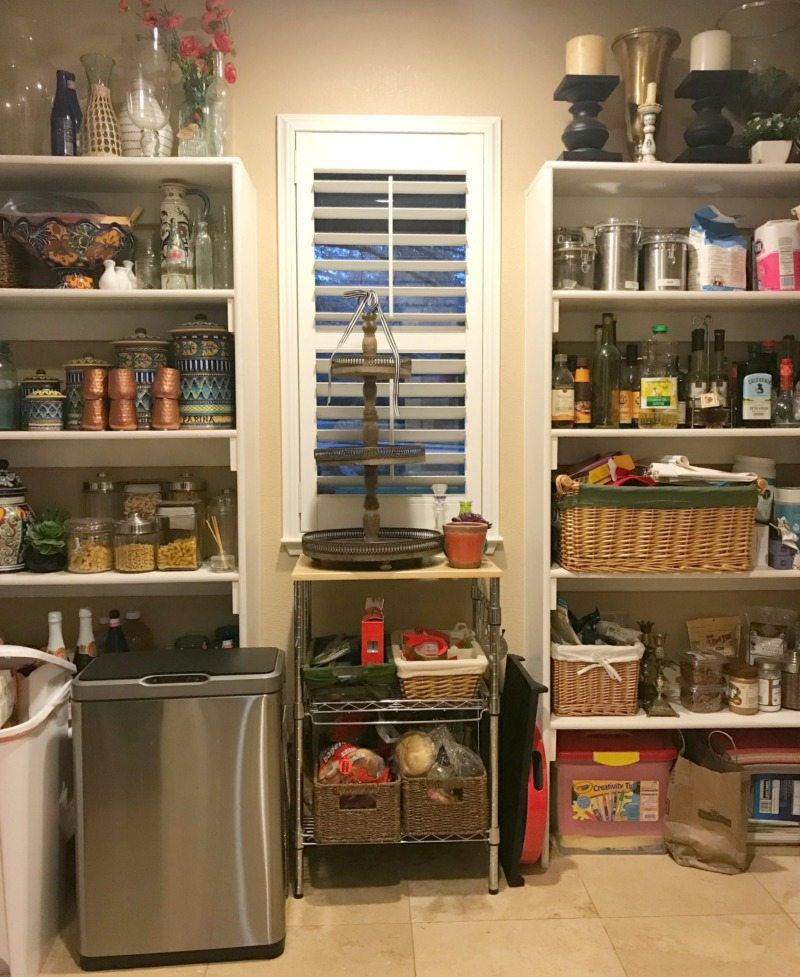
Before: Cluttered/Disorganized Pantry
Here’s a quick peek at what Jodie’s pantry looked like before. You might think, wow, it’s great! It’s HUGE and fabulous.
However, with the size comes unique challenges, the main one being that everything but the kitchen sink tends to end up in here.
Last year, it became increasingly obvious that her pantry needed an overhaul. No matter the size of your pantry, this hub of family activity is a common challenge spot and therefore a great place for us to start our New Year Organization.
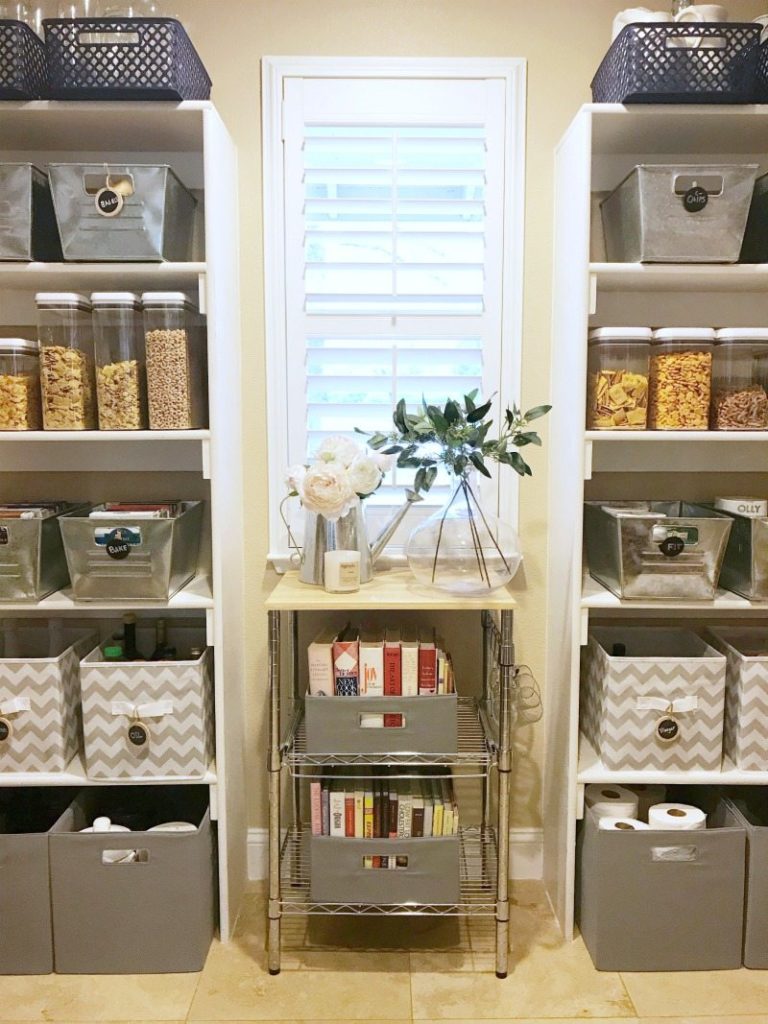
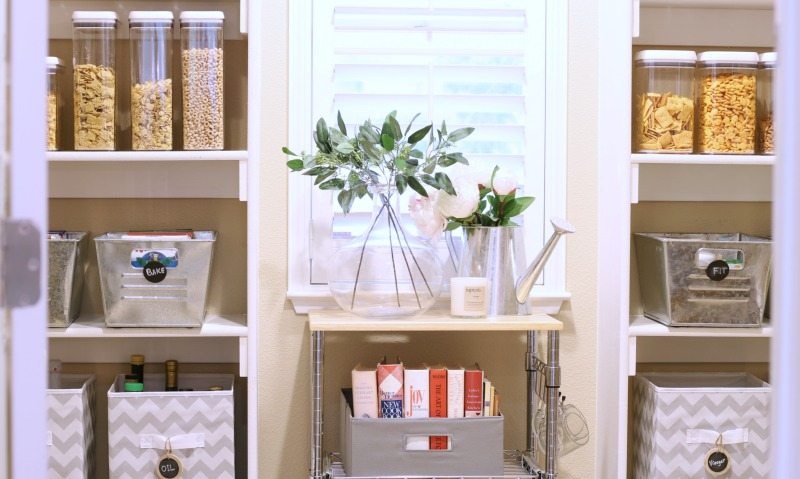
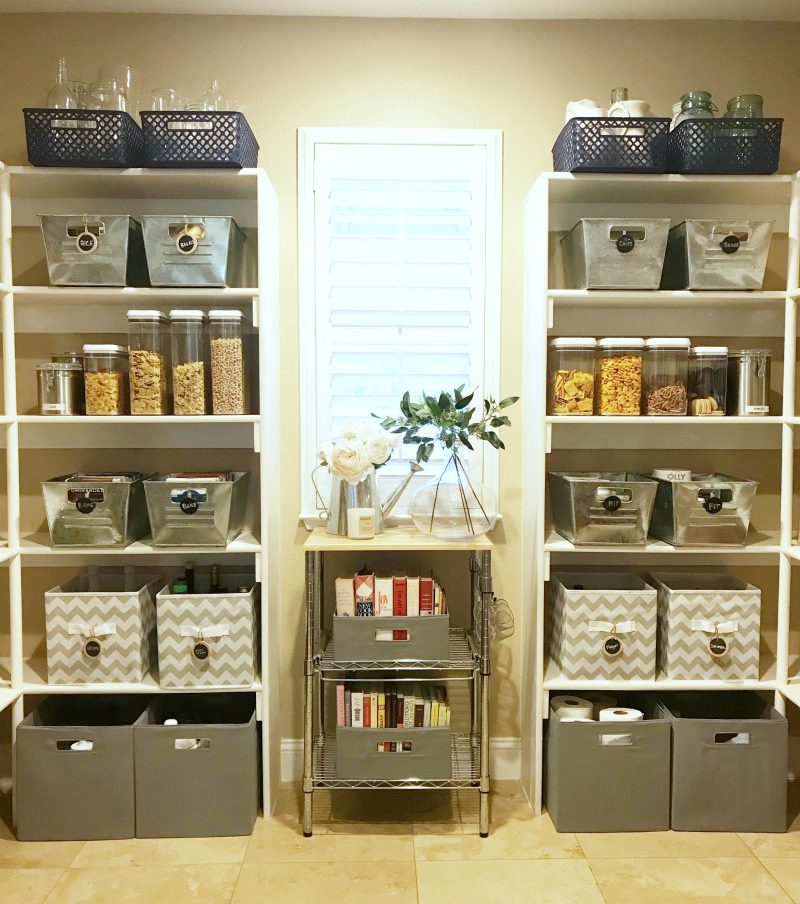
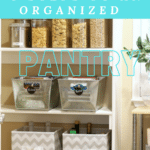
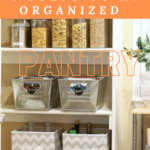
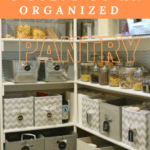
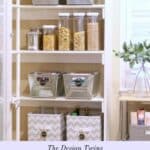
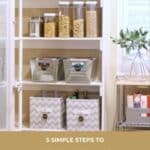
After: Organized Pantry
Step One: Declutter to Create an Organized Pantry
In any organization project, the first task is to evaluate inventory. Here is a breakdown of steps we use to declutter:
- Take everything out.
- Organize into piles. Put like items together so you can see how many you have. This is important so you can decide how many you really need in each category.
- Designate three bags: trash, recycle and charity.
- Go item by item and ask yourself if you really need it.
- If you haven’t used it in a full year get rid of it.
- Continue until you’ve made it through everything in your pantry.
Step Two: Planning to Create Your Organized Pantry
Now that you can see all that you have, you are ready to PLAN out your organized pantry.
- First, decide if all the categories belong in this area based on space available and daily use.
- Next, determine if everything will fit and how. You may decide at this point to get rid of more.
- Next, visualize configuration possibilities.
- Now, imagine what types of storage containers would work best based on space and type of items.
- Take measurements of shelf space etc.
- Now is a good time to visit Walmart.com where you will find a huge (and exciting) selection of solutions. This will help you in the planning of your space.
Step Three: Shopping for Your Organized Pantry
Now that you’ve organized, decluttered, visualized, measured and planned you are ready for to shop for your organized pantry.
Of course, you can always head to Walmart, but we find it even easier at this point to hop on the computer and shop at walmart.com. The benefits include:
- conveniently located
- a larger selection
- while in your space you can go back and forth visualizing, measuring etc.
- saves time and money (no gas, no running around)

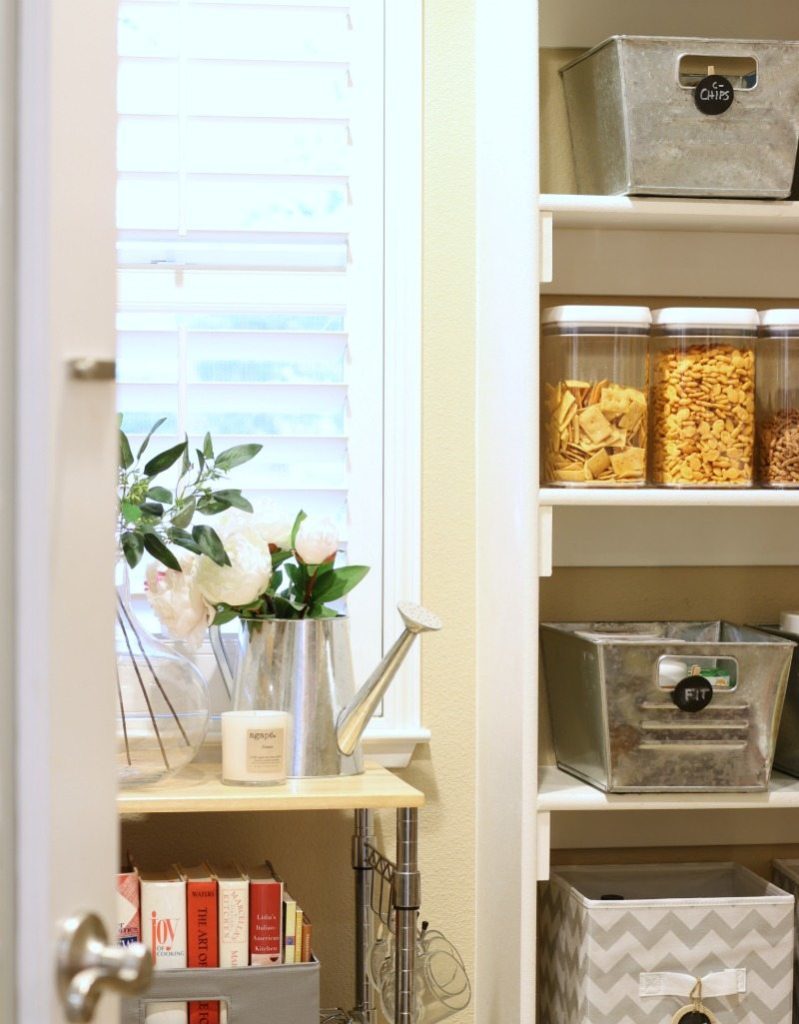
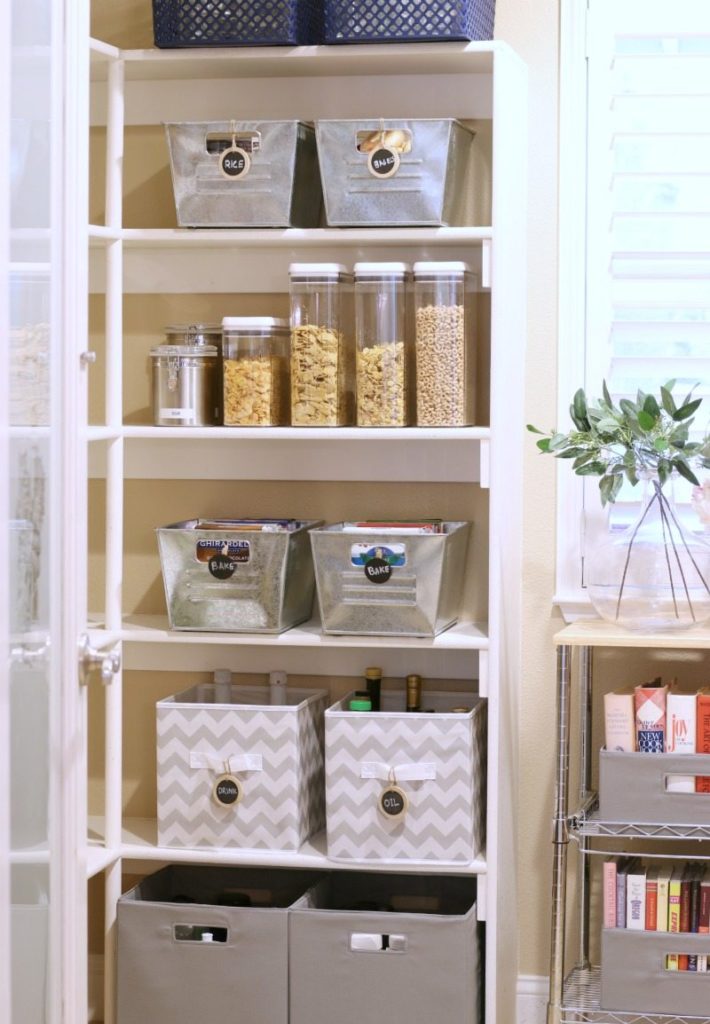
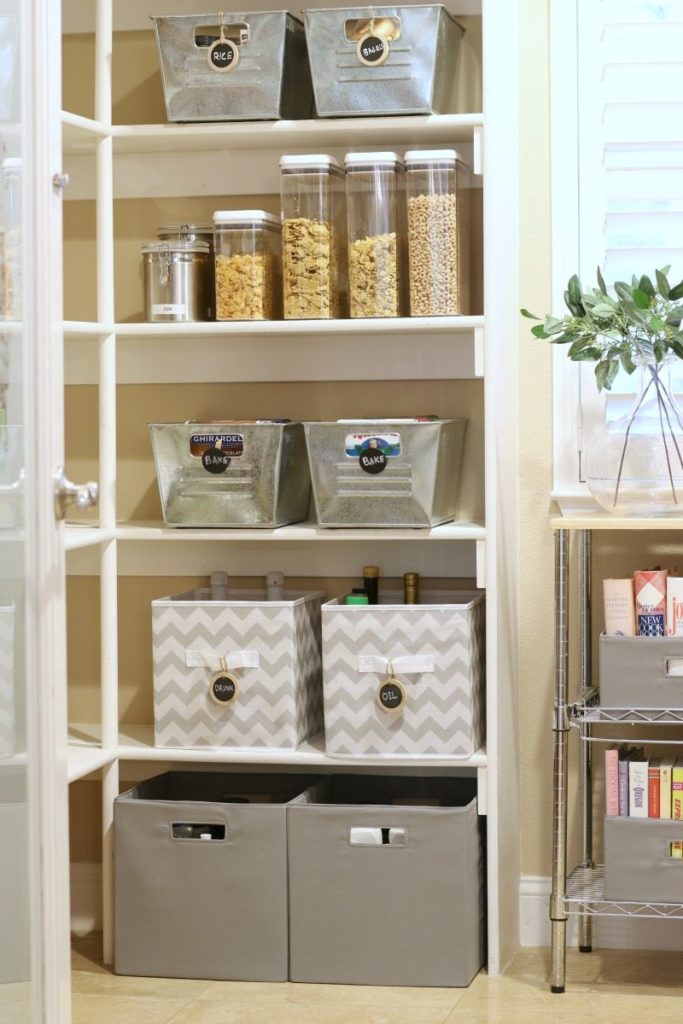
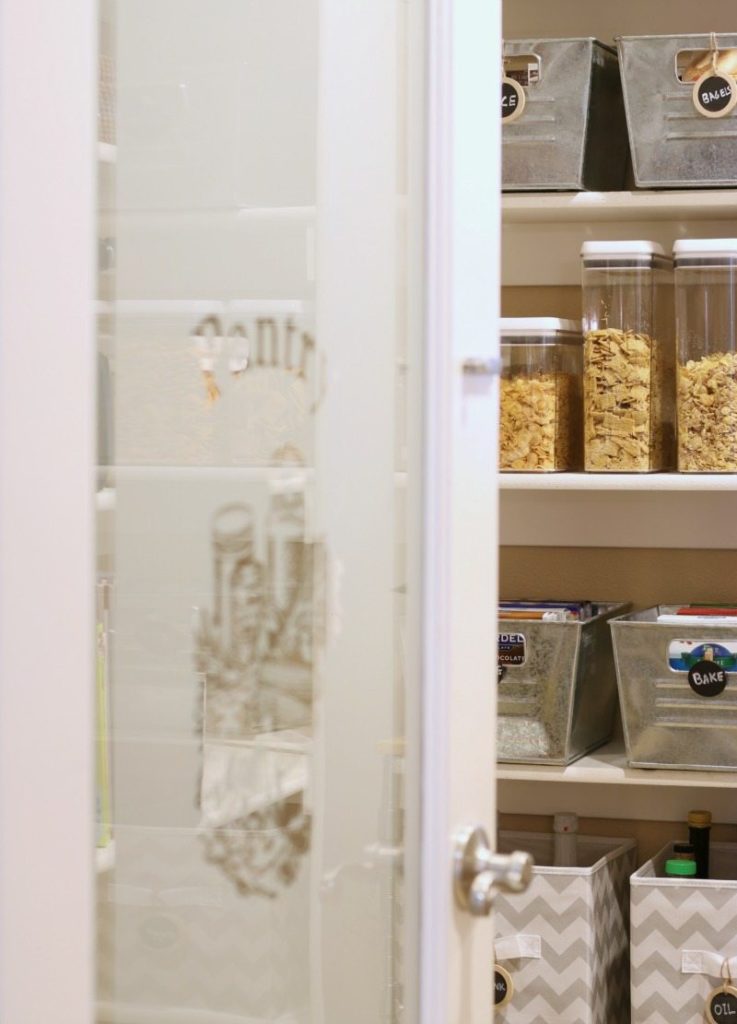
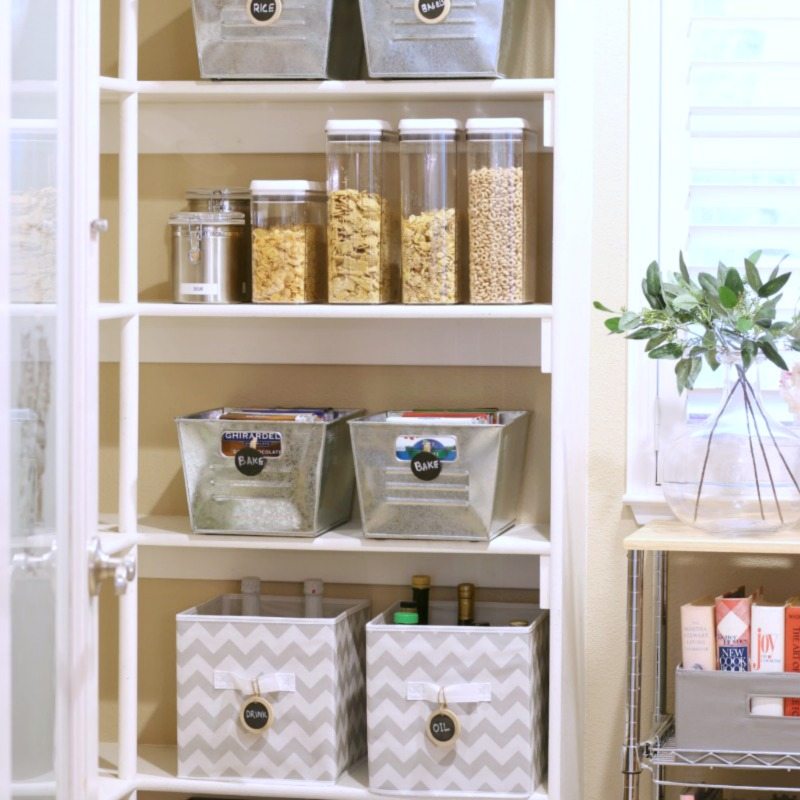
Organized Pantry Containers
You can click on the item to go directly to Walmart.com and shop. How convenient is that? These are affiliate links and Jodie and I always appreciate when you support our blog and shop with us.
Gray Fabric Storage Bins – I used these for floor storage because of their large size. They are perfect for items like paper towels, water bottles and any bulk items.

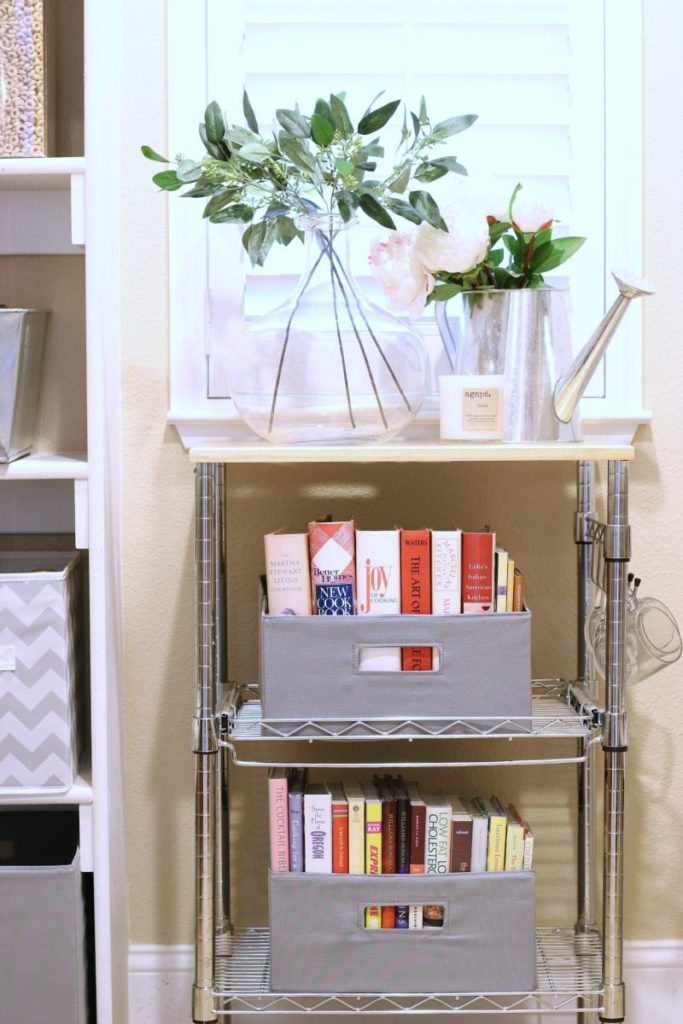
1/2 Size Gray Fabric Storage Bins – I used these to display my collection of recipe books.
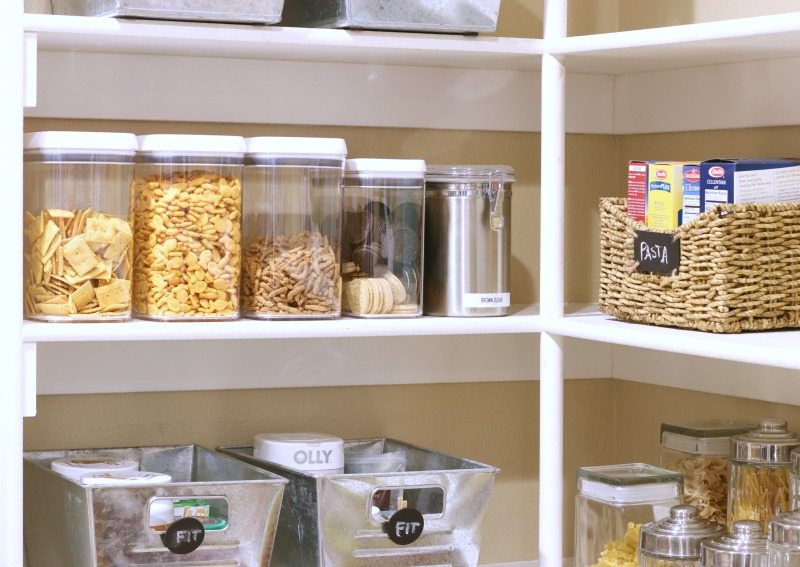
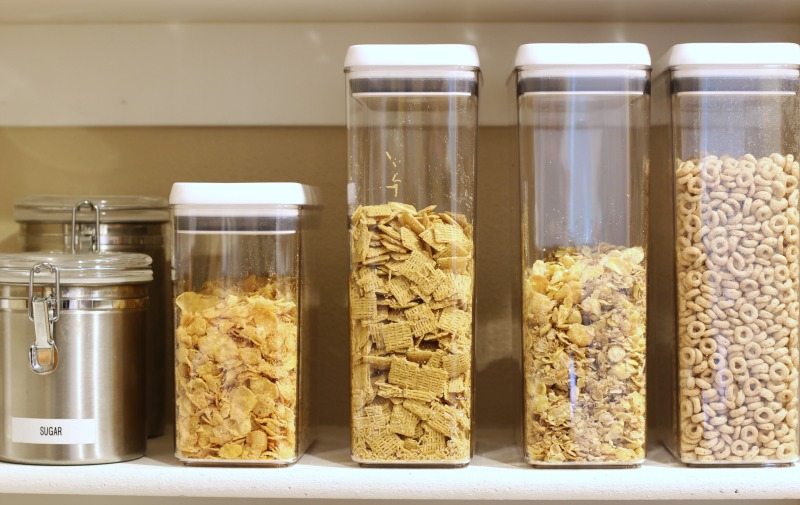
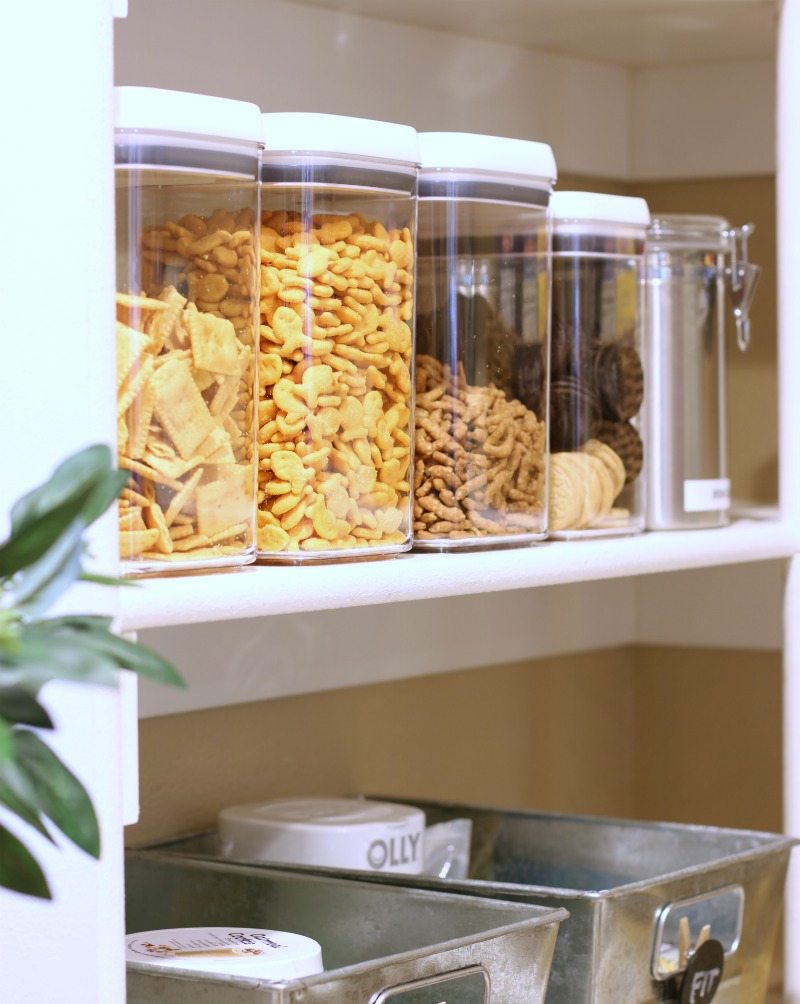
Plastic Flip Tight Food containers – These are perfect for food items like cereal, cookies, crackers and nuts. They are especially good if you have kids. They solve the problem of poorly closed boxes and stale food. If you buy in bulk these are fabulous. If you haven’t bought in bulk before these will help you start. Good for you, the environment, and your pocketbook.
Small Galvanized Bins – I used these for small pantry items like pasta, rice and baking supplies.
Medium-Sized Storage Bins – These I filled with bottles of vinegar, oils,
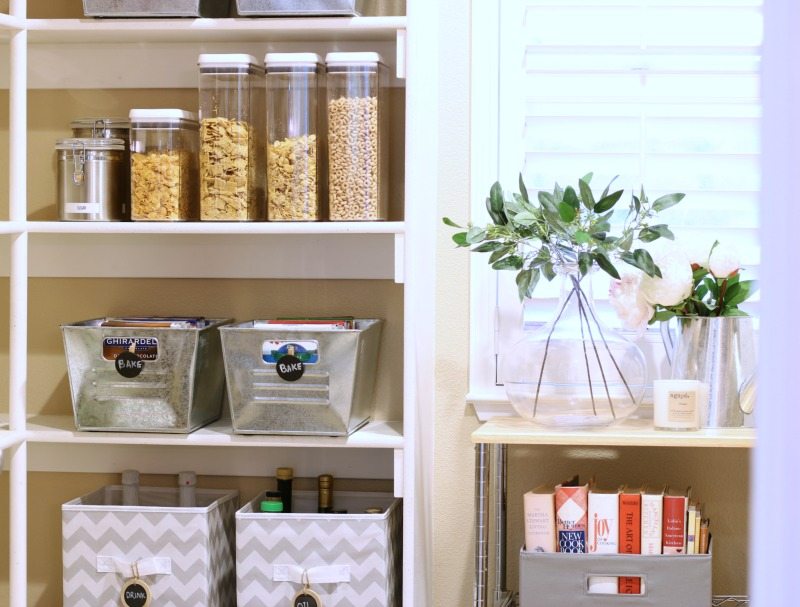
Organized Pantry: Labeling
- Labeling your bins and containers is always a good idea.
- Extra important when the container is opaque and the contents cannot be seen easily.
- Great way to achieve “compliance” from family members (and visitors) to keep things organized.
- I used some small wooden chalkboard tags to label my bins and containers for easy access.
- Chalkboard tags are a great idea because they can easily be changed if you decide to move things.
- They are easy to find at your local craft store.
Other ideas for labels:
- An old fashion label maker is still easy to use, inexpensive and can add a fun retro flare.
- Gift tags that match your color scheme can be attached by a small piece of twine or a small clothes pin.
- Cut and make your own out of card stock or recycled cards. Punch with a whole punch and add a fun ribbon.
Step Four: Make Your Organized Pantry Pretty
When you are planning and making your organizing decisions, keep these tips in mind:
- Start by making the background pretty by adding self-stick wallpaper, contact paper or painting.
- Next, consider using a pretty contact paper for the shelves.
- Choose a color and/or style theme and carry it through all your design choices.
- Make sure you have opaque containers for the items that you want to hide.
- If you want to show off what’s inside, use clear containers for your organized pantry.
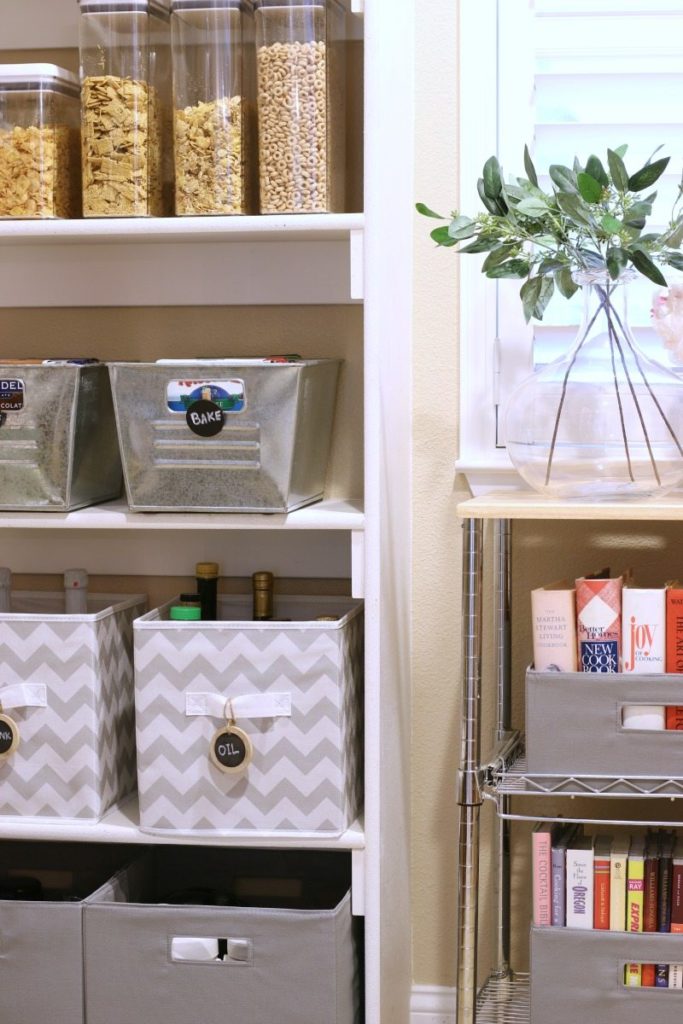
For my organized pantry, I chose gray as my theme color and decided to include a small pop of navy blue. I chose a gray chevron pattern to add a bit of interest. As you can see, I used mostly opaque containers. I wanted to hide all the messier looking stuff.
Some style themes/ideas include:
- multi-colored modern
- rustic farmhouse neutrals
- modern neutrals
- all white
- you can opt to match your kitchen color scheme, etc.
- or you can use this opportunity to “play” with a fun, new pop of color like yellow or turquoise
Step Five: Final Touches to Your Organized Pantry
We think this is the real fun: putting it all together. Here is where all your time and hard work pays off. As your organized pantry begins to emerge, have fun getting things just right. Play around with different arrangements until it looks great. Think about the realities of everyday use:
- Hide things that will tend to get messy with use.
- Put kid snacks where they can reach them.
- Put things you don’t want the kids to reach hidden and/or out of reach.
- Consider putting labels on bins, baskets and containers to help stay organized
- Place heavy items in spots that are easy to access.
- Give a final consideration to balance, colors and aesthetics to really make your organized pantry shine!
For more inspirational organization projects, check out our take on the Marie Kondo method of tidying up.
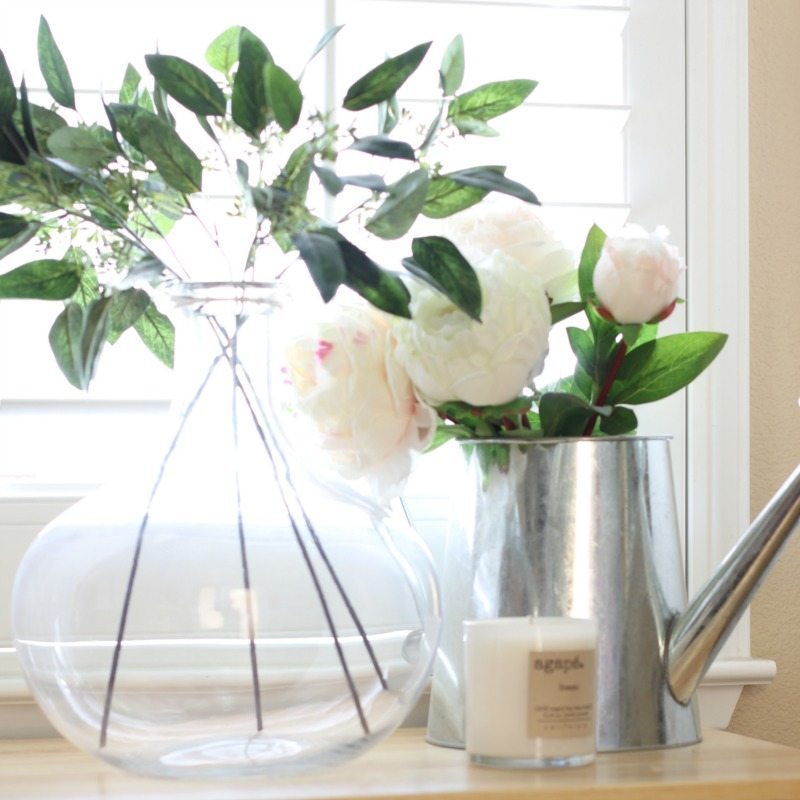
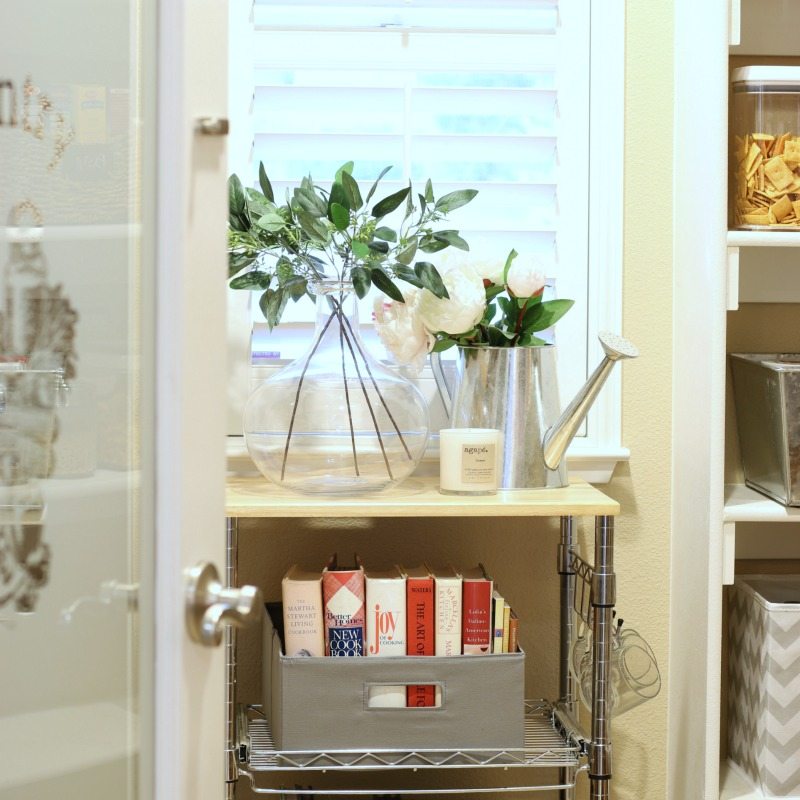
For my organized pantry, I decided to keep the small cart counter top for purely aesthetic purposes and brought in some faux flowers, a galvanized watering can (that matches the galvanized theme), a glass vase and a pretty candle. I love having candles in here in case the garbage ever has an odor. Isn’t it amazing what a difference a bit of natural beauty makes the overall look?
Pro Tip: Even in a functional space it’s always worth saving a bit of space for decor. The prettier it is the more motivating it will be to keep it that way.
You Have an Organized Pantry
Now it’s time to congratulate yourself and show it off to the family. Be sure to give them “a tour” of your new organized pantry, so everyone knows where things belong.
It’s a team effort to keep things organized. If everyone is on board, you’ll have a much better chance of your new organized pantry staying that way.
Next Steps for Your Organized Pantry
How good does it feel to have an organized pantry? We know, right? It feels amazing. Well, we recommend using this success to motivate you to continue onward and upward, Friends! You can use this same step-by-step process for all your storage areas: closets, cupboards, even drawers in your home.
For more pantry organization tips, read this blog post from The Turquoise Home.
Pro Tip: Make an organizing calendar and set a goal to organize one area a week.
Can you imagine how great you would feel? The more you do the easier it gets, even addictive. Now we’re talking about a great transformation. You’ve got this. Leave us a comment and tell us how you do. We can’t wait to hear about your successes.
Jodie and I would like to say a special thank you to our friends at Better Homes & Gardens at Walmart for partnering with us for 2018. We will be bringing you a new challenge every month as part of the Better Homes & Gardens Live Better Influencer Network. You can find the Better Homes & Gardens brand line carried exclusively by Walmart. Follow BHG on Facebook, Instagram, Twitter, and Pinterest.
Have you caught a bit of the “organizing bug”? Good. It just so happens that we have friends who can help you continue. Check out these other fabulously inspiring bloggers and their organizing tips and projects.
Good luck and Happy Organizing!
For more budget-friendly organizing solutions, visit the Better Homes and Gardens website.


I wish I had a pantry this size! I got a glimpse of your pantry door and love it. I had the same one in the home we moved from 7 years ago and I miss having that character. This makes me want to organize my current pantry which is just the closet under the stairs, but it is better than nothing!
Kallee, Julie doesn’t even have a closet…she just has this large customized floor-to-ceiling cupboard with pull-out drawers. I mean it works, but it’s a tiny fraction of what I have. The key is to make the most of your space…and this means organizing! So glad you enjoyed the post and we appreciate your reply. With love, Jodie & Julie
Your pantry looks fabulous! I am on a cleaning frenzy myself! Great tips and I love the space to make it pretty ????
Piper, haha, let the cleaning frenzy continue! I always say, when the motivation hits you must go with it! Because it doesn’t always hit 🙂 Hopefully this has motivated you even more. As always, we truly appreciate your sweet support. XO ~ Julie & Jodie
It looks fantastic Jodie. On my list to organize my pantry. Great tips and ideas you shared. Thank you
Great post i have a large pantry and tend to decorate it more than organize. The clear containers are a must have and the labeling. ????. Thanks
Hi Tee, So glad you got some helpful ideas from our pantry reorganization! Thank you for stopping by our blog. We hope you visit us again often for all kinds of ideas and inspiring in 2018. Good luck on your pantry improvements. All the best, Julie & Jodie
Nice job, Jodie!
Great tips that I’m definitely going to utilize. I love the idea of a fun print wall paper. I been working on my pantry recently too, and one thing I did was have installled a sensor light on a 60 second timer. It’s a game changer. I love it so much I put one in the kids bathroom and the garage too! ????????
Justine, We are SO glad you found this post helpful. Thanks for sharing your fun lighting improvement! Sometimes in life it’s the little things 🙂 Thank you for leaving a sweet reply…we really appreciate it. We hope you continue to enjoy our blog throughout the New Year (and beyond) Blessings, Jodie & Julie
Your pantry looks amazing! I never thought of putting all the bottles (olive oils etc) in a bin, but that makes total sense – the one you want is always way in the back! I am definitely going to try that. My pantry is in desperate need of organizing and I can’t wait to do it. Thanks for sharing!
Laura, Yay! We love to hear how you are inspired! woot woot! That is all we hope for 🙂 Hope our posts can continue to motivate and inspire you all year long. With gratitude, Julie & Jodie
Cleaned out my pantry few mos ago, a lot of things u suggested I did, but it gets messy quick, & I have no one getting there but hubs & I, so when I get all my other stuff done, going 2 work on it, my pantry not as big, lots of shelves, but less floor space, love your window, great job, btw my pantry bigger mess than my master closet
Hi La Donna, Thank you for reading and your kind reply! The pantry really is a trouble spot for many people…that’s why we chose to dedicate our first organizational post to this project specifically. And, it does take a continued commitment. It requires daily effort to maintain. But that is the case with all things. Hopefully you’ll find a system to help you or just discipline yourselves to maintaining the organization. Good luck, Sweetie! With gratitude, Julie & Jodie
So helpful and just what I needed to get motivated. Thank you
Darlene, Yay! This is exactly what we hoped to hear! Jodie and I plan to continue this organizational series so stay tuned. Good luck and cheers to staying motivated 🙂 XO ~ Julie & Jodie
[…] spring decorating when the moment feels right for YOU! Also since the New Year, we posted our Pantry Organizing Project which turned out even better than we had hoped! And lastly, we posted the latest in Instagram […]
This is a nice post. Thanks for sharing these simple tricks and tips for an organized pantry.
We thank you as well for visiting our blog and taking the time to reply. All the best, Julie & Jodie
Wow stunning space! Would love to convert my laundry room into an over-flow pantry space. Been wanting to incorporate white simple shelving like this. Did you build or buy these?
Thanks! 🙂
Hi Shawna,
Thanks for reading our blog and we always love it when people take the time to reply. This pantry was just as is just off a complete remodel when we purchased the home. Hope you got some good ideas. XO ~ Jodie & Julie
[…] better way to celebrate spring than to GET ORGANIZED! Jodie got a jump-start on spring with her Pantry Makeover. If you missed it definitely take a look. This post will give you all the motivation and tools you […]
[…] better way to celebrate spring than to GET ORGANIZED! Jodie got a jump-start on spring with her Pantry Makeover. If you missed it definitely take a look. This post will give you all the motivation and tools you […]
[…] for spring decorating when the moment feels right for YOU! Also since the New Year we posted our Pantry Organizing Project which turned out even better than we had hoped! And lastly, we posted the latest in Instagram […]
I love your organization skills!
Thank you Katy! It’s hard work and patience mainly. I suppose you could say all skills come from hard work 🙂 Thanks for visiting our blog! Your friends, Julie & Jodie
[…] How to Create an Organized Pantry in 5 Simple Steps – The Design Twins […]
Oh my goodness! You girls are amazing and twins at that!! Personally I’m not one to do the matchy game so I like what you created in your laundry room.
Dear Rebecca,
We are so excited that you are enjoying our blog! That means so much, especially coming from a fellow blogger. We hope you continue to enjoy and let us know how we’re doing. We are always ready to answer questions. All the best, Julie & Jodie
Beautiful job! Where did you put your beautiful Italian majolica serving pieces, canister sets, candles and candle holders, vases, pink flowers, copper Moscow mule mugs, and trashcan? Do you find another closet to store them, or do you go minimalist and sell or donate them? That’s the challenge for me, realistically! I make one place gorgeous but still have to store my other things somewhere else! Thank you for sharing tips on how you accomplish the rest of the leftover things!
Deborah,
Thank you sweet friend! We are so glad you found this post helpful. Sometimes I donate things, but I also like to keep things in storage (either the garage or in closets/cupboards) in case I find a place for them somewhere else in my home! I hope that makes sense, but Goodwill is always a great place to donate excess decor. You can also sell items on Poshmark or Facebook Market. I hope that helps!
Lots of love,
Jodie & Julie
It looks great! Thank you for the helpful tips. I always struggle keeping mine clean!
Love this! I have those clear containers from Walmart and they’re really great. The cereal sized ones are perfect for all kinds of things.
Keri,
We are so glad you found this blog post helpful! Those containers are really life savers for sure. Absolutely! Super handy. Thanks for the kind comment, we appreciate it!
Lots of love,
Jodie & Julie
Great post. I’m emailing it to my wife right now. I actually started step 1 today and if she gets home before me, she’ll be in for a shock : ) I especially love rule #5. If she’ll abide by that rule, we’re going to have a lot more space. Thanks again for the encouragement!
[…] Jodie and Julie with The Design Twins show you how to organize your pantry in 5 simple steps. They walk you through decluttering and organize your pantry to keep it organized. […]
If your budget is really tight, re-use cardboard boxes. Cover them with wall or wrapping paper In your choice of color/pattern. Sturdy and FREE.
Love those ideas! Thanks for sharing 🙂 XO ~ Julie