


Table of Contents:
- Step-by-Step Guide to Create Swoon-Worthy Photos in IG
- 1. Crop & Size
- How to Add Photo to Instagram, Crop and Size
- Step 1: Tap the + at the bottom of your home page as if you are going to add a new post.
- Step 2: Choose a photo from your phone’s library of photos that you want to post.
- Important Step 3: Before you tap Next to start editing and creating your post, select your size.
- Step 4: Tap Next and continue to Edit.
- Step 5: Choose Adjust and you can control where you want the photo cropped.
- 2. Adjust
- 3. Add Brightness to Create Swoon-worthy Photos
- 4. Use Highlight to Create Swoon-worthy Photos
- Time Out
- 5. Structure
- More Editing Tools to Create Swoon-Worthy Photos
- Ready to Create Swoon-Worthy Photos? Take This Quiz
- Create Your Own Swoon-Worthy Photos
How to create swoon-worthy Instagram photos with your camera phone (Updated June 2020)
Follow our easy, step-by-step guide to Instagram editing, and turn your basic camera phone shots into swoon-worthy photos you’ll love. In this post we will share with you all our secrets to improving your photos right in the Instagram app itself. So, there’s no need to buy a digital camera or spend money on fancy editing apps. Make the most of your camera phone with these easy tips. Here is a step-by-step guide to creating your own swoon-worthy photos in Instagram.
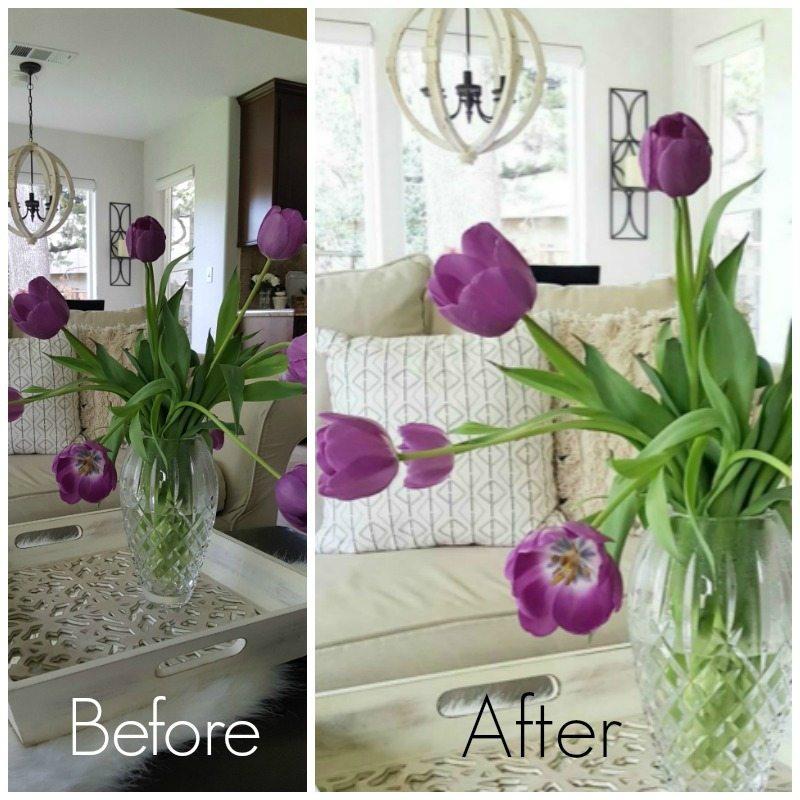
We all want to achieve swoon-worthy photos, but how? Even if you aren’t using a digital camera, beautiful photos are within reach if you follow this easy tutorial. Throughout this post we will show you side by side photos before and after Instagram editing. You’ll see the huge difference editing makes.

Before and After Instagram editing.
- Crop the original picture to focus in more on the bed and specifically the details of the throw and the pompoms.
- Select large, portrait size (vs. the default square size).
- Brighten just enough.
- Highlight to add to the drama of this pic.
- Add a bit of structure to increase the crispness
- Finally, bring back some of the shadows.

Step-by-Step Guide to Create Swoon-Worthy Photos in IG
1. Crop & Size
There are three size options available in Instagram:
- horizontal or wide mode
- the default square size
- the longer vertical portrait size
If there is one single decision that will increase the success of your photos it is this decision. We highly recommend choosing the tall, vertical portrait option. Why? Because these photos are more powerful. They take up more “real estate.” They occupy your followers screen for more time. This time is essential to drawing them in and grabbing their attention. Remember, people are scrolling fast. This added screen time is vital in today’s competitive Instagram world.
How to Add Photo to Instagram, Crop and Size
How to select the size and orientation of the photo? First of all, you must start with an original photo that is actually vertical size. If you start with a square photo you won’t have any option to choose the tall portrait size.
Step 1: Tap the + at the bottom of your home page as if you are going to add a new post.
Step 2: Choose a photo from your phone’s library of photos that you want to post.
Important Step 3: Before you tap Next to start editing and creating your post, select your size.
- Look for two expanding corners icon in the very bottom left corner of the photo.
- Tap this, and you will see your photo size change to the taller portrait size.
- In this small view it is deceiving because when you hit this toggle it appears that the photo gets smaller and further away.
- This is an illusion and doesn’t represent what the photo will look like on Instagram.
- It’s because the tall photo is too tall to fit into this square space at this moment.
- You will notice that it crops off a small amount of the photo from the top and bottom.
- It crops off considerably less than the square size, but the entire size of the vertical photo still is too big for Instagram.
- Note that you can move the crop up and down and select where you want the crop to be.
- You can do this here by moving the photo with your finger, or you can edit the crop in Edit in the next step.
Step 4: Tap Next and continue to Edit.
In this next step you can choose between Filter and Edit, select Edit.
Step 5: Choose Adjust and you can control where you want the photo cropped.
- Change the rotation of the photo by moving your finger left and right along the bottom graph of lines.
- Next, you can use two fingers to zoom in and out of your photo without changing the size of the photo.
- This is the only place you can do that.
2. Adjust
- The first step we take in Edit is to align my picture.
- Basically, you want your picture to be straight.
- Sometimes it’s hard to tell until you get into this mode and as soon as you start moving the alignment the grid lines will appear.
- Use these as your guide.
- If you took your shot on an angle this can get a little tricky.
- We suggest using the lines of your walls, or your table or couch (depending on your subject) and make sure these are lined up.
Note:
Some people choose to take purposefully crooked photos. How do we put this nicely? Julie and I think it makes pictures look “juvenile.” Ask yourself, have you ever seen magazines take pictures like this, and you’ll have your answer.
If you want your pictures to look professional and be taken seriously, we don’t recommend it. Our goal is swoon-worthy photos, so let’s leave the crooked photos for the teenagers who are just having fun.
3. Add Brightness to Create Swoon-worthy Photos
- This is an extremely useful editing tool because the biggest limitation in using a non-digital camera is the inability to control the amount of light.
- If you shoot your photos in bright natural light, they often come out blurry or fuzzy.
- The best solution to get those beautiful light and bright photos you see on Instagram is to take your pictures in moderate, indirect light and then brighten them up using this editing tool.
- A word of caution. In pursuit of swoon-worthy photos, be careful to not go crazy in this brightening mode.
- Over-brightening was one of our first editing mistakes.
- If you watch closely, you will see that at a certain point you start to sacrifice clarity/crispness and color.
- We will talk about ways to balance these later, but you want to tread lightly with adding brightness.
- You can always adjust a bit and come back later.

Before and After IG editing.
I took out some of the warmth to get rid of the yellow hue. I added brightness overall and highlights to whiten a bit more. Note: Editing for IG and editing for best website results are not always the same. Pictures which appear balanced on Instagram often appear too bright on the website. Case in point.
4. Use Highlight to Create Swoon-worthy Photos
- Next is Highlight, which is similar to Brightness
- Instead of bringing up ALL the light in the picture Highlight only brightens the whites and accents the areas where light is coming from.
- Highlight has a way of adding sparkle to a photo because it increases reflections from glass or anything that is reflecting light.
- You will want to play with this and how it balances with Brightness.
- Depending on the amount of contrast you want to have, while Brightness decreases contrast, Highlight increases it. These are both useful tools in achieving the light and bright goal.

This is a good example of how decreasing Warmth, increasing Brightness, increasing Highlights, and adding a bit of Contrast and/or Sharpness back in can really enhance the natural beauty found in these tulips.
Time Out
If all this editing has you confused at any point and you find yourself looking at the edited version and wondering if you are actually improving the photo or maybe even making it worse, just tap the photo at any time to take a quick peek back at the original. You can start over at any point by tapping the back arrow and selecting Discard. No harm done. Just start over.
I often do several takes with this whole editing process because I like to compare and contrast. You can use the Save Draft function and create several versions so you can take your time deciding before you finally decide to Share.
5. Structure
- Finally, we come to Structure, a useful editing tool if used with a light hand.
- If your photo has become washed out because of the amount of light (either edited or natural), you can use this function to create dimension or to give structure to the objects.
- It adds both highlights and low-lights to the edges of objects.
- Structure is a bit more subtle than Contrast.
- Structure is similar to but a little more dramatic than Shadows.

More Editing Tools to Create Swoon-Worthy Photos
- Contrast: This tool is useful if your picture is looking a little washed out. As mentioned above, it is similar to Structure in that it adds sharpness to the edges of objects, but comparatively is a bit sharper/more intense.
- Sharpen: This is supposed to add to the clarity of a picture. We don’t find that it makes a noticeable difference unless all you need is a very subtle crispness. It’s worth playing around with.
- Warmth: Great if you are using indoor (artificial) light that often throws a yellow hue over everything. You can lessen the warmth a bit until your wood tones and whites look less gold/yellow and have more of a neutral tone.
- Saturation: This fades the color a bit. You might want to play with this if you want to create a certain tone or mood that is a little softer. When there is a yellow or brassy tone, we sometimes play with decreasing this. If you want to increase color intensity, simply increase the saturation, but very slightly. A little goes a long way.

This photo was taken in a Selective Focus or Portrait mode. I deliberately chose to blur the background to concentrate the focus on the vignette in the foreground. Here you can see the before shot looks dull and lifeless. All it took was some editing with my handy brightness, highlighting, structure tools to make this into a fresh pretty vignette.
For more tips on how to edit photos for Instagram, read this article, “How to edit Instagram photos in 6 easy steps.”
Ready to Create Swoon-Worthy Photos? Take This Quiz
You can use these questions to quiz yourself or use them to review what you’ve learned from the above editing steps to create swoon-worthy photos.
-
If the picture is faded or blurry, but I don’t want to decrease the amount of light, what should I do?
- Increase Contrast.
- Increase Structure.
- or, if you can afford to decrease the light a bit go back to Brightness and see if you can decrease the Brightness a bit.
2. If the picture is too yellow what should I do?
- Decrease the Warmth to create a more neutral tone.
- Try decreasing Saturation a bit.
3. If the picture becomes too brassy and acid looking, how can I turn it into a swoon-worthy photo?
- Decrease the Highlights.
- Decrease the Structure.
- Or, just start over. Sometimes too much editing just starts to make a picture look fake. Start over and try to keep your edits soft and subtle for best results.

The trick when using a camera phone? Create a picture that is full of light but doesn’t sacrifice clarity or crispness.
Create Your Own Swoon-Worthy Photos
This is not a complete discussion of all your Instagram editing options. But it is a full review of everything you need to dramatically improve your photos for Instagram. You don’t have to be a professional photographer or even use a DSLR camera to create swoon-worthy photos for Instagram.
xoxo,
What’s Next?
- Ready to take your Instagram to the next level? We offer Personalized Instagram Audits that give you a complete analysis of your Instagram account, a detailed road map for success, and 90 minutes of video coaching.
- Also be sure to subscribe to our blog so you don’t miss any of our valuable content. Click on the box below to receive bonus VIP printable, our free Instagram Photo Editing Guide.
- Read our many other Instagram related blog posts
- If you are debating whether or not to upgrade to a digital camera you’ll definitely want to read our post, “Camera Phone vs. Digital Camera: Pros & Cons.” We walk you through a detailed comparison based on ease, time, cost, and value of both so you can make an informed decision and decide method is best for you.


Great tips! I use 3 of those features consistently but I think I’ll try a couple new ones too!
Hi Christin, We are so very glad you found this helpful. Jodie wrote it, and I edited it. As I edited even I learned some things (and I’ve been at this longer than she! haha) Jodie is a master (and a perfectionist). So it’s pretty cool that she sat down and was able to share all her advice with everyone. I may be biased but I think she’s pretty awesome (hee hee). Thanks again for stopping by and even more, for taking the time to leave a sweet comment. We hope you’ll stay tuned for all the fun here on our blog. Blessings, Julie (& Jodie)
Fabulous info. I too love the IG. editing features. The info on structure was extra helpful, I’ve just started playing around with it, and wasn’t quite sure I knew why!
Hi Lucy, First of all, thank you!! Thank you for your comment and for coming to visit us here! I’m so happy you found the article on editing tips helpful. It’s interesting because I just experimented with each tool one by one. Not every tool is necessary or beneficial for every photo. Sometimes you can’t even TELL if the edit made a difference, or if so, for better or worse. That’s why you need to keep trying and keep experimenting. You will suddenly come across the photo where that particular editing tool (ie. structure) is the PERFECT fix. Have fun with it! And thanks again for your sweet comment! xoxo Jodie & Julie
Thank you! I have been in business a long time, but I am new to social media! I appreciate your taking the time to explain photo editing!
Hi Joyce, You are so welcome! Thank you for taking the time to come over and visit our blog! It is precisely because I am such a novice photographer that I realize that others like me could benefit from what I have learned. Thanks again! I’m so happy you found it helpful! xoxo Jodie & Julie
This was such a great article! Very useful info!
Hi Kelly, Wow! You know, that means so very much to me! We are trying so hard (and we are new to this)…so to hear that our topic and our execution of the topic was helpful really makes it all worthwhile! We hope you will continue to come back and enjoy our blog because we are just getting started. Julie just quit her “day job” because we are all in…haha! It’s like we’ve been saving up our whole lives for this role and honestly had no idea how much we had to share…it is pouring out of us as fast as we can publish…so stay tuned. With love and gratitude for your sweet support, Jodie & Julie
Finalky I have a great phone with great camera – sony xperia – and can’t wait to follow your advice on the editing process… Before this phone I used my dslr, the same Julie has , and yes, it takes forever to use that Julie! 🙂 Thank you for this great article Jodie! 🙂
Eszter, Wow, so interesting. I’m really ready to trade in my iphone6 for the Galaxy. I still love the camera for the blog, but it seems less and less worth it for IG. I just don’t have time to do daily 5-step photo shoots! haha! It’s so nice to see you here over on the blog. Your kind support means everything to us. It feels like our friendships have a much greater opportunity to flourish. Today is my last day at my other job (working at the decor store), and from tomorrow forward I am dedicating myself to our blog (and IG), so I’m super excited. We couldn’t be happier to have you join us, sweet friend, on this journey together. May God bless you always, Julie & Jodie
Agree 🙂 I love my camera for product photos, but for IG it is just too time-consuming….
Congratulations for your new day job!!!! 🙂 Probably you will work more hours now without being out from home. 😉
I love reading your blog sweet friends! Can not wait to see where it takes you on your journey!
Eszter
Dear Eszter, Your words touch our hearts deeply! You don’t even know how much it means to us to hear your kind comments after you read our posts and to hear in your “voice” that you are really enjoying our blog! Hip Hip Hooray! The greatest blessing is how IG and now our blog is connecting us with people who we now consider our friends. It is a heart-warming feeling for sure. Can’t wait to collaborate again with you, our sweet girl! Blessings and love, Julie & Jodie
I am glad you have shared the whole post in such step by step way. If someone follow this tutorial then he doesn’t need to go anywhere else to know about photo editing in Instagram!
Wow, James, what a wonderful compliment. Jodie and I work together as a team, creating content, editing every single post. So we really hope each post is clear, organized, and as helpful as it possibly can be. Writing for such a wide audience is challenging, but so enjoyable. We are thrilled you made it to our blog and sincerely appreciate the kind feedback. Our series on Instagram is ongoing so we hope you will subscribe and continue learning from our information-packed series. Good luck on your Instagram journey. With gratitude, Julie & Jodie
Wonderful tips for editing pictures. I will be trying them on my pictures. March Madness
Love this post. I have so much to learn. March Madness. And keep on teaching us newbies ????
Wow thank you so much for this post. This was super helpful. I found you both on Instagram ( I am dreamyydecor) when I just started about 2.5 or so weeks ago. I am a newbie and have been having issues with lighting in my images. I have been taking them with my iPhone 6 but luckily I just got the 7 and think the quality will be more clear. I have a canon point and shoot I might be trying out to see if it’s better. I have just read your recommendations for newbies. Beyond helpful. All of the questions I had but didn’t know who to ask. I am so thankful to have found you both early on in my journey. Your images are beautiful, I thought you were using a DSLR. Continued blessings to you both.
Denise, We are so glad you found us too! What great timing. Boy do we wish we had had this guidance when we started haha! Seriously, we’ve had a long road of plundering through…making mistakes and learning as we went. Just do your best, have fun, don’t be afraid to ask questions, make friends, and ENJOY the journey. Wishing you all that and more, Julie & Jodie
Very helpful tips for editing pictures.
Thank you.
Yay, Mary! It makes us smile to know we are helping you. Hip Hip Hooray! Thanks again sweetie. All the best, Julie & Jodie
Perfect editing tips. I think it will give a new height to my editing skills. I have been editing for a few months. So, I am still a beginner and looking forward to developing my skills. I like to edit photos a lot and have been doing so lately. Your article is so easy to understand. And the tips are so perfect I can’t wait to try them out. Thanks a lot for the article.
Annie,
We are so glad we are inspiring your editing skills and getting you on the right track to success! We hope to see you enjoying our future posts, thank you for the sweet comment!
Lots of love, Julie & Jodie
nice post…thanks for sharing.
Great post. Articles that have meaningful and insightful comments are more enjoyable, at least to me. It’s interesting to read what other people thought and how it relates to them or their clients, as their perspective could possibly help you in the future.
Hi there,
Thank you for your input on this blog post! We are glad you found it so helpful and interesting.
Hope to see you enjoying more of our posts in the future!
XOXO,
Jodie & Julie
Thank you for an easy to follow format for editing in IG. The article was very helpful in clarifying what tools do what! I appreciate this information. Thank you again.
Alicia,
Of course sweet friend! We are so glad you learned something valuable from this post. We love hearing from you on the blog!
Lots of love,
Jodie & Julie
Loved this Blog Post! I learned a lot about photo editing and using the features IG offers! I was using LR and now iI am very happy to see this tool! Thank you so much!
Your tutorials are so easy
David,
We are so glad to hear you find our tutorials easy to follow. It means a lot to us!
Lots of love,
Jodie & Julie
I got lots of ways about how to edit photos. Also known about IG features you use on your blog. Thanks for sharing this with us.
Very much informative post about instagram photo editing. The tips and tricks you shared is perfect and effective for pro photo editing by instagram. Thanks for sharing this type of helpful post.
We’re glad you like the tips and tricks we provide in this post. We hope you continue to enjoy our blog. Thanks for leaving a kind comment. Best, Julie & Jodie
Nice technical topics for Instagram professionals. Thanks for sharing with us.
Instagram is the best place for marketing, but it is real, many people do not perfectly go there for their marketing. Here best tips for insta.
What an excellent blog topics here you have written on you blog. I have learned something new here.
Nice technical topics for Instagram professionals. Thanks for sharing with us.
There is so much useful information contained in this post. Really smart witty way to say things. I really appreciate it. I will check back later for more great content. Thanks for sharing with us.
Great tips. I thinks it is very informative information .Excellent photos and article!
Lot of thanks. I appreciate your knowledge. Congratulations on your excellent job!
The post is great. People who are not able to edit photo with a tool, for them this post will helpful.
Thanks. We agree with that and are happy to hear you think the same.